Kodak EasyShare printer dock 6000 — User's Guide
Table of Contents > Using the Printer Dock with a Computer > Installing the Software
5 Using the Printer Dock with a Computer
Installing the Software
|
|
|
|
|
||
|
|
||||

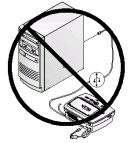
| NOTE: | For more information on installing the software, see the ReadMe file on the Kodak EasyShare printer dock 6000 software CD. |
On a Windows-based computer:
-
Close all software applications that are open on your computer.
-
Place the Kodak EasyShare printer dock 6000 software CD into the CD drive.
-
Load the software:
-
If an install window does not appear, select Run from the Start menu and type: d:\setup.exe (if d is the drive letter that contains the CD).
-
Follow the on-screen instructions. Use the installer menus to select a language. If prompted, restart the computer when the installation is complete.
-
On Mac OS X:
-
Close all software applications that are open on your computer.
-
Place the Kodak EasyShare printer dock 6000 software CD into the CD drive.
-
Load the software:
-
Double-click the CD icon on the desktop, then double-click the Kodak PD6000 Installer icon.
-
Follow the on-screen instructions. Use the installer menus to select a language. When prompted, restart the computer.
-
Open the finder window and click the Applications button. If you don't see the Applications button, access the Applications folder on your operating drive.
-
Open the Utilities folder, then double-click Print Center.
-
In the Printer List window, click the Add Printer button.
-
Select Kodak PD6000, then click Add.
The Kodak EasyShare printer dock 6000 is added to your computer.
-
Uninstalling
On a Windows-based computer:
-
From the Start menu, select Settings, then select Control Panel.
-
Double-click Add/Remove Programs.
-
Select the Kodak PD6000 program, then click Remove. Follow the on-screen instructions. If prompted, restart the computer.
-
From the Start menu, select Settings, then select Printers.
-
Right-click the Kodak PD6000 printer icon, then select Delete.
-
Follow the on-screen instructions. For Windows 2000 or Windows XP, continue to the next step. Otherwise stop here.
-
From the Start menu, select Settings, then select Printers.
-
Select Server Properties from the File menu, then click the Drivers tab.
-
Select Kodak PD6000, then click Remove.
-
Click OK when complete.
On Mac OS X:
-
Double-click the operating drive for your system.
-
Select Library, then select Printers.
-
Open the Kodak folder, then double-click Kodak PD6000 Uninstaller. Follow the on-screen instructions.
Previous Next