Kodak EasyShare P712 zoom digital camera — User's guide
Table of Contents > Doing more with your camera > PASM and C1, C2, C3 modes
4 Doing more with your camera
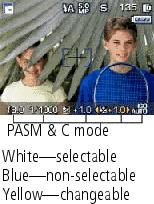
PASM and C1, C2, C3 modes
Settings you change in C modes apply only to pictures taken in those modes.
For example, if you change the Color Mode to Sepia while in PASM, you still retain the color setting if you change to Auto or SCN mode. If you are in the C modes, the color change is applied to pictures taken only in those modes.
| NOTE: | The settings, including Flash, are maintained for PASM—even when you change modes or turn off the camera. Use Reset Camera (see
 ) to reset PASM to their default settings.
 |

Changing PASM or C1, C2, C3 mode settings
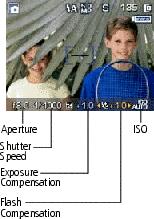
PASM and C modes control the f-number (aperture), shutter speed, exposure compensation, and flash compensation.
|
|
|
|
|
|
1.
Turn the Mode dial to P, A, S, M, or C1, C2, C3.
|
||
|
2.
Use the Command dial and Set button:
|
|||
|
4.
Take a picture.
|
|||
 Menu, see
 Using exposure compensation with exposure bracketing
In PASM modes, you can use exposure compensation in conjunction with exposure bracketing.
| If the exposure compensation is set to: |
And if the exposure bracketing interval is set to 3 steps:
|
Then the exposures taken are: |
|---|---|---|
|
0.0 +1.0 –1.0 |
Set the drive mode to Exposure bracketing 3 (see Using the drive mode for self-timer, burst, exposure bracketing) |
–0.3, 0.0, +0.3 +0.7, +1.0, +1.3 –1.3, –1.0, –0.7 |
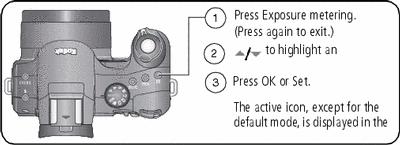
Using exposure metering
Choose a metering system in PASM or C modes for the appropriate lighting of your subject.
| NOTE: | For rapid setting changes, see Using the command dial for rapid setting changes. |


 to move the cross-hair graphic to the desired zone.
 Previous Next