Kodak EasyShare Z712 IS zoom digital camera — User's guide
Table of Contents > Taking pictures/videos > Using the Drive button
2 Taking pictures/videos
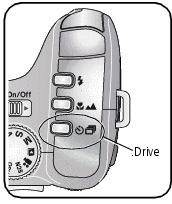
Using the Drive button
|
Mode |
Icon(s) |
Purpose |
|
Self-timer |
|
|
|
Burst |
|
See Using burst |
|
Exposure Bracketing |
|
|
|
Normal |
(none) |
Normal picture-taking |


Using the self-timer
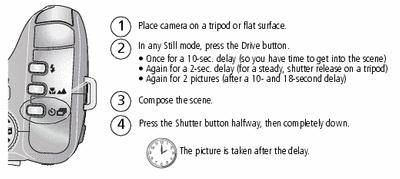
To cancel the Self-timer before the picture is taken, press the Drive button. (The Self-timer setting remains active.)
Use the same procedure to take a video, but:
-
Turn the Mode dial to Video
 .
. -
Press the Shutter button completely down.
| NOTE: | The video stops when no storage space remains. Only the 2- and 10-second options are available in video mode. |
Using burst
Press the Drive button to choose a burst mode.
| Mode | Icon | Description | Purpose |
|---|---|---|---|
|
First Burst |
|
Camera takes up to 6 pictures while the Shutter button is pressed. |
Capture an expected event. Example: A person swinging a golf club. |
|
Last Burst |
|
Camera takes up to 30 pictures while the Shutter button is pressed. When the Shutter button is released, only the last 6 pictures are saved. |
Capture an event when the precise timing is uncertain. Example: A child blowing out birthday candles. |


|
|
|
|
|
|
1.
In most Still modes, press the Drive button repeatedly to choose an option.
|
||
|
2.
Press the Shutter button halfway to focus and set exposure.
|
|||
|
3.
Press the Shutter button completely down and hold it to take pictures.
The camera stops taking pictures when you release the Shutter button, when the pictures are taken, or when there is no more storage space.
|
|||
Using exposure bracketing
Use exposure bracketing to determine the best exposure (light) level for your conditions. During exposure bracketing, the camera takes 3 pictures:
-
One at + (above normal) exposure
-
One at 0 (normal) exposure
-
One at - (below normal) exposure
Evaluate the 3 pictures, and decide which exposure level is right for you. (Burst is not available in all modes.)
|
|
|
|
|

|
1.
Press the Drive button repeatedly to choose Exposure Bracketing.
|
||
|
2.
Press the Shutter button halfway to focus and set exposure.
|
|||
|
3.
Press the Shutter button completely down to take the 3 pictures.
To evaluate the pictures, press the Review button.
|
|||

Previous Next