KODAK ESP 7200 Series All-in-One Printer — Extended User Guide
Table of Contents > Printing > Printing pictures
4 Printing
Printing pictures
You can print pictures with your all-in-one printer from:
-
A memory card inserted into a memory card slot
-
A storage device (such as a flash drive) or camera connected to the front USB port with a USB cable
-
A BLUETOOTH Technology enabled device (with the optional KODAK Wireless 2.0 USB BLUETOOTH Adapter plugged into the front USB port)
-
An iPhone, iPod touch or iPad Device (may not be available with all models). For information, go to www.kodak.com/go/picflick.
You can also print pictures using Home Center Software from your computer with WINDOWS OS. Home Center Software lets you edit and enhance your pictures quickly. Open Home Center Software, select Print Pictures, then follow the on-screen instructions.
On a computer with either MAC OS or WINDOWS OS, you can print pictures from KODAK EASYSHARE Software or any picture-editing or photo-management software.
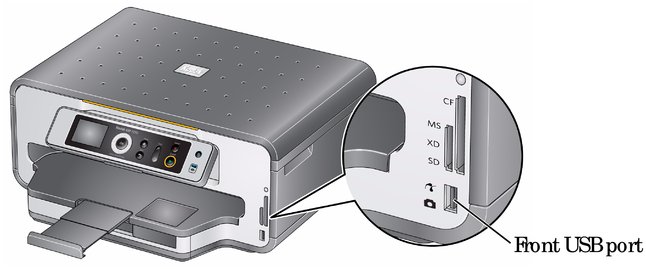
Printing from a memory card or USB-connected device
You can print pictures from the following cards or USB-connected devices:
| MS/XD/SD Card slot | CF Card slot | Front USB port |
|---|---|---|
|
|
|
| IMPORTANT: | If you use a memory card with an adapter, make sure you insert and remove the adapter and the memory card as a unit; do not remove the memory card while leaving the adapter in the printer. |
Using default settings to print a picture
To print a picture from a memory card or USB-connected device using the default settings:
-
Insert the memory card into the appropriate slot, or connect the digital camera or portable drive to the front USB port.
IMPORTANT: Use only one slot or port at a time.

-
Press
 or
or  to select the picture you want to print.
 -
Press Start to begin printing.
The printer prints a single 4 x 6 in. / 10 x 15 cm picture.
IMPORTANT: To prevent loss of data from your memory card, do not remove it from the printer while printing.
Changing the settings and printing a picture
You can change the print photos options for an individual picture or group of pictures, or you can change the settings and save them as the default.
To print a picture or pictures using settings other than the default settings:
-
Insert the memory card into the appropriate slot, or connect the digital camera or portable drive to the front USB port.
IMPORTANT: Use only one slot or port at a time.
-
Press
 or
or  to select the picture you want to print, then press OK.
 -
Repeat step 2 for each picture you want to print.
-
Press Home.
-
Press
 to select View and Print Photos, then press OK.
 -
Press
 to select an option, then press
  or
or  to change the setting.
 Print Photos Option Settings Description View Photos
--
Scroll through the pictures on the memory card.
Transfer All to PC
--
To transfer all the pictures on the memory card to your computer, press OK then Start . (Your printer and computer must be connected with a USB cable.)
Rotate This Photo
Press OK to rotate the selected photo.
Quantity
1 (default) to 99
The number of copies that print.
Tray Selection
Top Tray (default)
Picture prints on the paper in the top tray.
Bottom Tray
Picture prints on the paper in the bottom tray.
Print Size
2 x 3
3.5 x 5
4 x 6 (default)
4 x 7
5 x 7
If bottom tray is selected, the following choices also appear:
4 x 12
8 x 10
8.5 x 11 or A4
If the selected print size is smaller than the paper in the paper tray, the printer automatically arranges the pictures to best fit the paper size.
Plain Paper Quality (only available if bottom tray is selected)
Normal (default)
Good quality output; prints faster than Best.
Best
The highest quality, but the slowest print speed; eliminates the banding effect that sometimes occurs when printing Draft or Normal.
Draft
The fastest print speed, but the lowest quality.
Photo Paper Quality
Automatic (default)
The printer detects when you load photo paper and sets Best quality automatically.
Scene Balance
On (default) Off
Adjusts the image brightness to correct for underexposure and reduces the variation in contrast in different areas of the picture.
Color
Color (default)
Prints full color.
Black & White
Prints black and white (gray scale).
Add Date to Prints
No (default) Yes
Prints the date of the picture(s) (the date the picture was taken or last edited) in a corner of the print.
Save as Defaults
No (default) Yes
To save settings as the new default, press OK , select Yes , then press OK .
-
When you have finished changing settings, press Start to begin printing.
IMPORTANT: To prevent loss of data from your memory card, camera, or portable drive, do not remove it from the printer while printing.
Printing tagged pictures
Some digital cameras let you tag (or "mark") pictures on the memory card for printing. This creates a tag that is recognized by the printer. If you choose to print tagged pictures, they will be printed according to the default settings on your printer (unless otherwise specified by the tag from the camera).
| NOTE: | Refer to your camera user guide to determine whether your camera supports tagged (also "marked" or "DPOF") functionality. |
To print tagged pictures:
-
Insert the memory card into the appropriate slot.
-
When the "Print tagged images?" message appears, press Start.
Printing panoramic pictures
To print a panoramic picture, load 4 x 12 in. / 10 x 31 cm paper, or US letter or A4 paper in the main paper tray.
-
Insert the memory card into the appropriate slot, or connect the digital camera or portable drive to the front USB port.
IMPORTANT: Use only one slot or port at a time.

-
Press
 or
or  to select the picture you want to print, then press OK.
 -
Press Home.
-
Press
 to select View and Print Photos, then press OK.
 -
Press
 to select Tray Selection, then press
  to select Bottom Tray.
 -
Press
 to select Print Size, then press
  to select 4 x 12.
 -
Press Start to begin printing.
IMPORTANT: To prevent loss of data from your memory card, camera, or portable drive, do not remove it from the printer while printing.
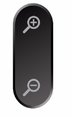
Zooming and cropping pictures
Use the zoom buttons to select a portion of your picture for printing.
To zoom and crop a picture:
-
Insert the memory card into the appropriate slot, or connect the digital camera or portable drive to the front USB port.
IMPORTANT: Use only one slot or port at a time.

-
Press
 or
or  to select the picture you want to crop, then press OK.
 -
Press Zoom + to enlarge the picture on the LCD. A red box shows the area that will be printed.
NOTE: You can press Zoom + repeatedly to enlarge the picture in increments of 0.25 up to a magnification of 5X. Press Zoom – to decrease the magnification in increments of 0.25 down to 1X.
-
Use the navigation buttons to move the picture on the LCD up, down, left, or right. Only the part of the picture in the red box will print. The crop window matches the aspect ratio of the selected output print size.
NOTE: Zooming and cropping does not change the saved picture on the memory card.
-
When you are satisfied with the picture, press OK. The picture appears in the original view with a red box around the portion of the picture that will print.
-
Press Start to begin printing.
Printing pictures from a BLUETOOTH Technology enabled device
You can print pictures from wireless devices, such as mobile phones, digital cameras, and Personal Digital Assistants (PDAs) using the optional KODAK Wireless 2.0 USB BLUETOOTH Adapter.
To print a picture from a BLUETOOTH Technology enabled device:
-
Insert the KODAK Wireless 2.0 USB BLUETOOTH Adapter into the front USB port.
-
"Pair" the printer and the device so they can communicate.
NOTE: You must "pair" from your device's interface. For instructions, see the user manual for your device.
-
Select the picture you want to print, then select Send to begin printing.
The printer prints one 4 x 6 in. / 10 x 15 cm picture.
NOTE: See the user guide for your device for more information.
Previous Next