KODAK ESP 7200 Series All-in-One Printer — Extended User Guide
Table of Contents > Scanning > Scanning from the control panel
6 Scanning
Scanning from the control panel
To scan a document or a picture from the control panel:
-
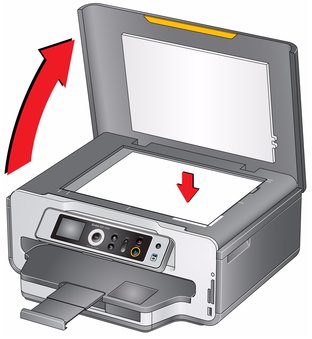
Lift the scanner lid, and place the original face down in the right-front corner of the scanner glass.
-
Close the lid.
-
Press Home.
-
Press
 to select Scan, then press OK.
 -
Press
 to select an option, then press
  or
or  to change the setting.
 Scan Option Settings Description Scan To
USB-connected computer (default)
The scanned file is sent to the USB-connected computer.
Name of computer (only if a computer is connected by wireless or Ethernet network)
The scanned file is sent to the computer on the wireless or Ethernet network.
Memory card
The scanned file is sent to the memory card in one of the card slots.
IMPORTANT: Use only one card slot at a time.
Scan What
Document (default)
Sets the scan settings for scanning a document (Changing the scan settings for scanning from the control panel).
Photo
Sets the scan settings for scanning a photograph (Changing the scan settings for scanning from the control panel).
Destination
File (default)
Sends the scanned file in the format and to the location on your computer that you designate (Changing the scan settings for scanning from the control panel).
Application
Sends the scanned file to Home Center Software.
Save as Defaults
No / Yes
To save the settings as the new default, press OK, select Yes, then press OK .
-
Press Start to begin scanning.
The scanned file appears at the destination you specified.
Previous Next