KODAK ESP 9200 Series All-in-One Printer — Extended User Guide
Table of Contents > Networking Your Printer > Connecting to an Ethernet network
2 Networking Your Printer
Connecting to an Ethernet network
| NOTE: | The printer cannot be connected to a wireless network and to an Ethernet network at the same time. (The printer can, however, be connected to an Ethernet network and to the computer via USB cable at the same time.) If you connect an Ethernet cable to the back of the printer, the wireless connection will automatically disconnect and the Wi-Fi connectivity LED will turn off. When you disconnect the Ethernet cable, the Wi-Fi radio will automatically connect to the last connection. |
Before you connect to an Ethernet network, you need:
-
An Ethernet network that includes a router, switch, or hub with an Ethernet port.
-
A Category 5 (or higher) Ethernet cable.
-
To temporarily disable your firewall until the printer is successfully installed and communicating. For information, go to www.kodak.com/go/inkjetnetworking.
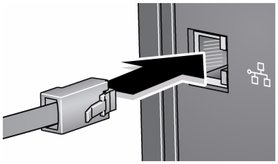
To connect to an Ethernet network:
-
Connect the Ethernet cable to the Ethernet port on the back of the printer.
-
Connect the other end of the Ethernet cable to an available Ethernet port on your router, switch, or hub.
-
If you haven't yet installed the KODAK All-in-One Printer Software, go to www.kodak.com/go/aiodownloads and follow the on-screen instructions to install the software and complete your setup.
Previous Next