KODAK ESP Office 2100 Series All-in-One Printers — Extended User Guide
Table of Contents > Printing > Printing pictures
5 Printing
Printing pictures
You can print pictures with your all-in-one printer from:
-
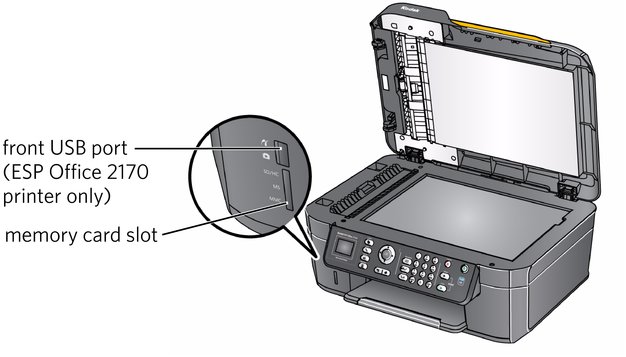
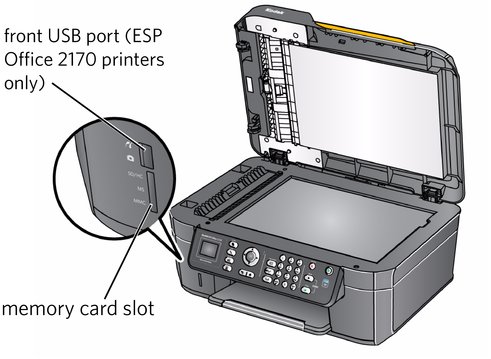
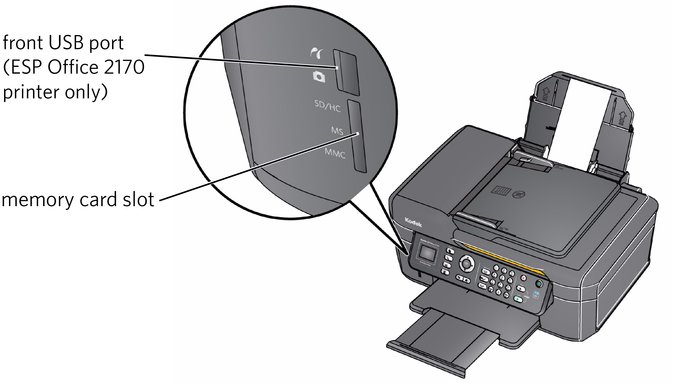
A memory card inserted into a memory card slot
-
A storage device (such as a flash drive) or digital camera connected to the front USB port with a USB cable (KODAK ESP Office 2170 printer only)
-
An iPhone, iPod touch, iPad, BLACKBERRY Device, or ANDROID OS Device (may not be available with all models). For information, go to www.kodak.com/go/mobile.
You can also print pictures using Home Center Software from your computer with WINDOWS OS. Home Center Software lets you edit and enhance your pictures quickly. Open Home Center Software, select Edit and Print Pictures, then follow the on-screen instructions.
On a computer with MAC OS or WINDOWS OS, you can print pictures from KODAK EASYSHARE Software or any picture-editing or photo-management software.
Viewing pictures on a memory card or USB-connected device
| NOTE: | The option to use a USB-connected device, such as a digital camera or USB flash drive, is available only on the ESP Office 2170 printer. |
When you insert a memory card into the memory card slot on your printer or a USB-connected device into the USB port, the pictures on the card or device appear on the LCD. Press  or
or  to scroll through the pictures.
If the printer is idle for more than two minutes, the LCD will revert to the status display. To view the pictures again, press any button, then press  or
or  .
.
Finding pictures on a memory card or USB-connected device
Your printer can help you locate pictures on a memory card or USB-connected device by the date the picture was taken or last saved.
To locate pictures:
-
Insert the memory card into the memory card slot or connect the USB device to the front USB port (ESP Office 2170 printer only).
-
Press Home.
-
Press
 to select View / Print Photos, then press OK.
 -
Press
 to select Find Photos, then press OK.
 -
In the View by Date menu, press
 to select Year, Month, and/or Day; press
  or
or  to select the specific year, month, and/or day.
 The number of photos found for the date you specified appears under the menu name.
-
Press OK to view the pictures.
Printing from a memory card or USB-connected device
You can print pictures from the following cards or USB-connected devices (ESP Office 2170 printer only):
| MS/XD/SD Card slot | Front USB port (on ESP Office 2170 printer only) |
|---|---|
|
|
| IMPORTANT: | If you use a memory card with an adapter, make sure you insert and remove the adapter and the memory card as a unit; do not remove the memory card while leaving the adapter in the printer. |

Using default settings to print a picture
Unless you change the default settings, the default for printing pictures is one 4 x 6 in. / 10 x 15 cm picture. (To change the default settings, see .)
To print a picture from a memory card or USB-connected device (ESP Office 2170 printer only) using the default settings:
-
Load photo paper (see Loading photo paper ).
-
Insert the memory card into the memory card slot, or connect a digital camera or USB flash drive to the front USB port.
IMPORTANT: Do not use the memory card slot and the USB port at the same time.
-
Press
 or
or  to select the picture you want to print.
 -
Press Start Black to print a black-and-white picture, or Start Color to print a color picture.
The printer prints a single 4 x 6 in. / 10 x 15 cm picture.
IMPORTANT: To prevent loss of data from your memory card, camera, or portable drive, do not remove it from the printer while printing.
Changing the settings and printing pictures
You can change the print photos options for an individual picture or group of pictures, or you can change the settings and save them as the default.
To print a picture or pictures using settings other than the default settings:
-
Insert the memory card into the memory card slot, or connect a digital camera or USB flash drive to the front USB port (ESP Office 2170 printer only). A picture appears on the LCD.
IMPORTANT: Do not use the memory card slot and the USB port at the same time.

-
Press
 or
or  to select the picture you want to print, then press OK.
 -
Repeat step 3 for each picture you want to print.
-
Press Back for Remote Printing Settings.
-
Press
 to select an option (see table below), then press
  or
or  to change the setting.
NOTE: You can also adjust the print photo options using the Online Printer Management Tool. When viewing the tool in your browser (see Accessing the Online Printer Management Tool), select the Settings tab, then select Copy & Print > Print Photo.
-
When you have finished changing settings, press Start Black to print a black-and-white picture, or Start Color to print a color picture.
IMPORTANT: To prevent loss of data from your memory card, camera, or USB flash drive, do not remove it from the printer while printing.
Printing tagged pictures
Some digital cameras let you tag (or "mark") pictures on the memory card for printing. This creates a tag that is recognized by the printer. If you choose to print tagged pictures, they will print according to the default settings on your printer (unless otherwise specified by the tag from the camera).
| NOTE: | Refer to your camera user guide to determine whether your camera supports tagged pictures (may also be called "marked" or "DPOF") functionality. |
To print tagged pictures:
| NOTE: | Make sure Tagged Images Printing is On (see Configuring printer settings). |
-
Insert the memory card into the memory card slot or connect a camera to the front USB port (ESP Office 2170 printers only).
-
When the "Print tagged images?" message appears, press Start Black to print a black-and-white picture, or Start Color to print a color picture.
Printing panoramic pictures
To print a panoramic picture, load 4 x 12 in. / 10 x 31 cm paper, or US letter or A4 paper in the paper input tray.
-
Insert the memory card into the memory card slot, or connect a digital camera or USB flash drive to the front USB port (ESP Office 2170 printer only).
-
Press
 or
or  to find the panoramic picture you want to print, then press OK.
 -
Press Back for Remote Printing Settings.
-
Press
 to select Print Size, then press
  to select 4 x 12.
 -
Press Start Black to print a black-and-white picture, or Start Color to print a color picture.
IMPORTANT: To prevent loss of data from your memory card, camera, or USB flash drive, do not remove it from the printer while printing.
Printing from a wireless device
You can print pictures wirelessly at the touch of a button from:
-
iPhone (iOS 3.0 or later)
-
iPod touch (2nd generation)
-
iPad
-
BLACKBERRY Device (software v4.5 or later)
-
a device running ANDROID OS v2.0 or later
For more information, see Mobile Printing.
Previous Next