KODAK OFFICE HERO 6.1 All-in-One Printer — Extended User Guide
Table of Contents > Networking Your Printer > Adding a wireless network connection to a USB-connected computer
2 Networking Your Printer
Adding a wireless network connection to a USB-connected computer
You can change the way you connect to your printer at any time.
Changing from USB to a wireless connection
To change the printer connection type from USB to a wireless (Wi-Fi) network:
If your printer is connected to a computer with WINDOWS OS:
-
Disconnect the USB cable from your printer and computer.
-
On your computer, disable any firewall you have installed until you have successfully completed the installation.
-
If you have not already done so, connect your printer to your wireless network. See Connecting to a wireless network.
-
Select Start > All Programs > Kodak > KODAK Printer Setup Utility.
-
If your wireless all-in-one printer (example: KodakOFFICEHERO6.1+1002) is not listed:
-
Select No, my printer is not listed, then click Next.
-
Select your printer from the list.
-
Select Network - Wireless/Wi-Fi, then click Next. When your printer is detected, driver installation begins.
-
-
If your wireless all-in-one printer (example: KodakOFFICEHERO6.1+1002) is listed:
-
Select the all-in-one printer that is connected to your network.
-
Select Yes, my printer is listed, then click Next. When your printer is detected, driver installation begins.
-
-
-
When driver installation is complete, click Done.
The printer with a wireless connection is listed as the name of the printer plus a number (for example, KodakOFFICEHERO6.1+1002).
If your printer is connected to a computer with MAC OS:
-
Disconnect the USB cable from your printer and computer.
-
If you have not already done so, connect your printer to your wireless network. See Connecting to a wireless network.
-
Select Apple > System Preferences.
-
Under Hardware, select Print & Fax or Print & Scan.
-
Click + in the dialog box.
-
Select your printer from the list.
-
Click Add, if required.
The printer with a wireless connection is listed as the name of the printer plus a number (for example, KodakOFFICEHERO6.1+1002).
Changing from USB to an Ethernet connection
Before you connect, you need:
-
an Ethernet network that includes a router, switch, or hub with an Ethernet port.
-
a Category 5 (or higher) Ethernet cable.
-
to temporarily disable your firewall until the printer is successfully installed and communicating.
To change from a USB connection to an Ethernet network connection:
-
Disconnect the USB cable from your printer and computer.
-
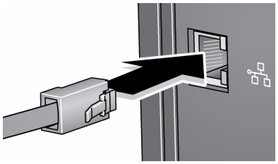
Connect the Ethernet cable to the Ethernet port on the back of the printer.
-
Connect the other end of the Ethernet cable to an available Ethernet port on your router, switch, or hub.
If your printer is connected to a computer with WINDOWS OS:
-
Select Start > All Programs > Kodak > KODAK Printer Setup Utility.
-
Select No, my printer is not listed, then click Next.
-
Select KODAK OFFICE HERO 6.1 AiO from the printer list.
-
Select Network - Ethernet cable, then click Next.
The Printer Setup Utility searches for your printer and connects automatically.
-
Click Done.
If your printer is connected to a computer with MAC OS:
-
Select Apple > System Preferences.
-
Under Hardware, select Print & Fax or Print & Scan.
-
Click + in the dialog box.
-
Select your printer from the list.
-
Click Add, if required.
Previous Next