KODAK HERO 9.1 All-in-One Printer — Extended User Guide
Table of Contents > Faxing > Before you begin faxing
9 Faxing
Before you begin faxing
Before you can send or receive faxes, you must connect your printer and set up the fax options.
Connecting the printer for faxing
Selecting the country/region
For the fax to work properly, the country or region selected on the printer must match your location. This setting determines how your faxes are sent and received.
To set the correct country or region:
-
Press
 .
. -
Touch
 , then touch Printer Settings.
 -
Touch
 , then touch Country/Region.
 -
Touch
 to scroll through the selections, then touch your country or region to select it.
Determining your telephone system type
The instructions for setting up your printer for faxing differ depending on the type of telephone service you have. Determine the type of telephone service you have, and connect your printer accordingly.
| IMPORTANT: | Use the phone cord that was provided with the printer. If you use any other phone cord, you may not be able to send or receive faxes successfully. |
-
Standard telephone service — telephone service that uses dedicated telephone wiring to transmit only phone signals
-
Cable telephone service — telephone service that is delivered by a cable television service
-
Digital Subscriber Line (DSL) — telephone service that uses the wires of a local telephone network to transmit digital data over cables
-
Internet telephone service (Voice-Over-Internet-Protocol or VOIP) — telephone service delivered by an Internet Service Provider
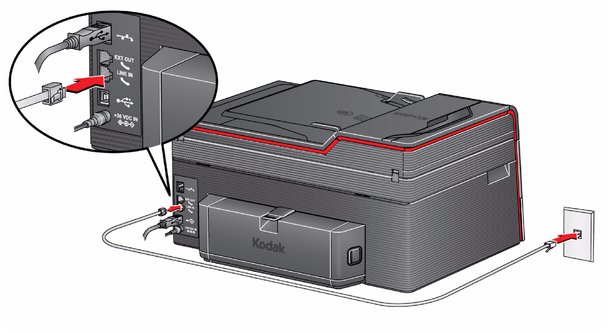
Connecting to a standard telephone service
If you have a standard telephone service, connect one end of the phone cord that came with the printer into the LINE IN port on the back of the printer and the other end into the wall phone jack.
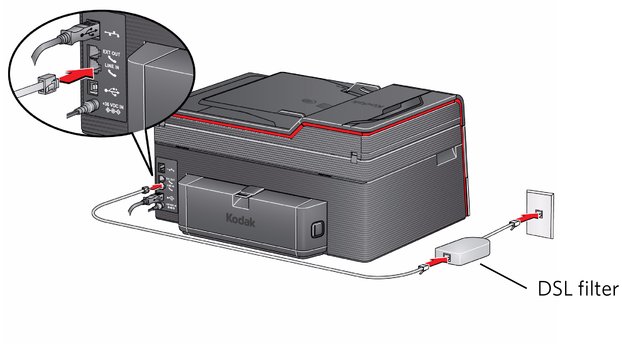
Connecting to a Digital Subscriber Line (DSL)
If you have a DSL telephone service, connect one end of the phone cord that came with the printer into the LINE IN port on the back of the printer and the other end into the DSL filter (available from your DSL provider), which is connected to the wall phone jack.
| NOTE: | You must use a DSL filter to transmit fax signals properly to your printer. |
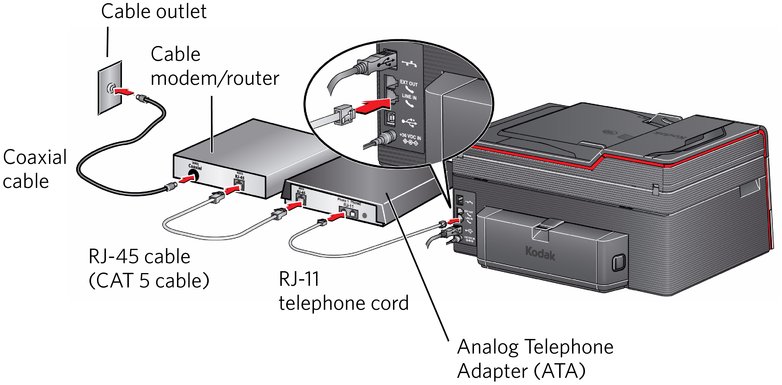
Connecting to an Internet or cable telephone service (Voice-Over-Internet Protocol or VOIP)
If you have an Internet or cable (Voice-Over-Internet Protocol or VOIP) telephone service, you should already have a cable modem/router connected to the cable outlet with a coaxial cable. You will also need an Analog Telephone Adapter (ATA) to connect your printer for faxing.
| NOTE: | Sometimes the cable modem/router has a built-in ATA. Contact your cable telephone service provider for more information. |
-
Connect an RJ-45 (also called CAT 5) cable from the cable modem/router to the WAN port on the Analog Telephone Adapter (ATA).
-
Connect one end of the phone cord that came with the printer (RJ-11 telephone cord) to one of the phone input ports on the ATA and the other end to the LINE IN port on the back of your printer.
Determining whether your phone line is dedicated or shared
To connect your printer for faxing correctly, you need to determine whether your phone line is shared or dedicated.
-
A dedicated phone line is one that has only this printer and no other devices connected to it. If you have a dedicated line, connect your printer as described for your type of phone service (see Connecting to a standard telephone service , Connecting to a Digital Subscriber Line (DSL) , or Connecting to an Internet or cable telephone service (Voice-Over-Internet Protocol or VOIP)).
-
A shared phone line is one that has several devices connected to it, such as a phone and/or answering machine as well as the printer. If you have a shared line, connect your printer in one of the following ways, based on the devices you have connected to the same phone line.
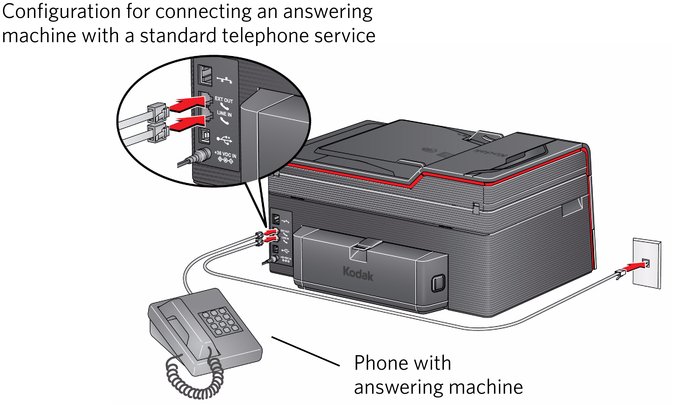
If you share the line with an answering machine or telephone:
-
Connect one end of the phone cord that came with the printer into the LINE IN phone port on the back of the printer.
-
Connect the other end of the phone cord into either a wall phone jack or a DSL filter, depending on the type of telephone service you use.
-
Connect one end of the phone cord for your answering machine into the EXT OUT phone port on the back of the printer.
-
Connect the other end of the phone cord into the answering machine or telephone.
NOTE: If you have an answering machine, set the number of rings to answer on the printer to a higher number than the rings to answer for the answering machine ().
If you have an answering service :
If you have an answering service that uses a computerized system for recording messages remotely for the same phone line that you use for your all-in-one printer, then you can set up a distinctive ring to receive faxes automatically ().
If you do not set up a distinctive ring, you can still receive faxes manually (Receiving a fax manually ).
-
Entering fax sender information
Fax sender information appears in the header of any fax that you send from your all-in-one printer. Typically this is your name or your business name and your fax number.
| NOTE: | If you do not enter fax sender information, the header on faxes that you send will be blank. |
To enter fax sender information:
-
Press
 .
. -
Touch
 , then touch Fax.
 -
Touch Fax Settings, touch Fax Sender Information, then touch a field to enter:
-
your name or business name
-
your fax number
-
-
Press OK to save the information.
Selecting fax settings
Before sending or receiving faxes, select the fax settings.
-
Press
 .
. -
Touch
 , then touch Fax.
 -
Touch Fax Settings, touch
 or
or  to scroll through the settings, then touch a setting to make a change.
 .
.  .
.  .
. To adjust fax settings from the Online Printer Management Tool:
-
Open the Online Printer Management Tool (see Accessing the Online Printer Management Tool).
-
Select the Settings tab, then select Fax > Settings.
-
Change the Sender Information and/or fax Settings as needed.
-
Click Save to update the settings.
Setting the answer mode (auto answer or manual)
The default setting for Auto-Answer is on. When Auto-Answer is on, the printer picks up all incoming faxes automatically.
To answer calls manually, touch Answer now on the LCD or turn off Auto-Answer (see also Receiving a fax manually ):
-
Press
 .
. -
Touch
 , then touch Fax.
 -
Touch Fax Settings, then touch Fax Auto-Answer.
-
Touch Off to turn Auto-Answer off.
Working with the phonebook
You can enter up to 60 fax numbers in the phonebook.
You can create and manage the phonebook from the printer LCD or, if your printer is connected to a computer with WINDOWS OS, you can use Home Center Software.
You can also use the Online Printer Management Tool to edit the Fax Phone Book. See Using the Online Printer Management Tool to edit the Fax Phonebook.
Using symbols in phonebook entries
You can use the following symbols in phonebook entries:
| Symbol | Description | Response by fax |
|---|---|---|
|
0 - 9 |
numbers |
Dials the number |
|
* |
star |
Used for special features (for example, *70 is used to deactivate call waiting) |
|
# |
pound |
Used for special features (for example, # at the end of a number signifies the completion of the number sequence) |
Touch Pause to add a comma. This causes a 2-second delay before dialing the remaining numbers.
Adding a new phonebook entry
To add a new phonebook entry:
-
Press
 .
. -
Touch
 , then touch Fax.
 -
Touch Phonebook.
-
Touch Add New.
-
Touch the fields to enter the name and number for a recipient. Touch OK to save the information.
-
Optional: Assign a Quick Dial number.
You can set up your ten most frequently used fax numbers as Quick Dial numbers. You will be able to dial them quickly, and they will be displayed at the top of your phonebook.
-
Touch Quick Dial, then select an available number to assign to the contact.
-
Touch OK to finish.
-
-
When you have finished, touch OK to save.
Editing a phonebook entry
To edit a phonebook entry:
-
Press
 .
. -
Touch
 , then touch Fax.
 -
Touch Phonebook.
-
Touch
 or
or  to scroll through the contacts, then touch the entry you want to edit.
 -
Touch the fields you want to change, then touch OK to save.
-
Repeat steps 4-5 to edit more entries; when you are finished, press
 .
.
Deleting a phonebook entry
To delete a phonebook entry:
-
Press
 .
. -
Touch
 , then touch Fax.
 -
Touch Phonebook.
-
Touch
 or
or  to scroll through the numbers, then touch the entry you want to delete.
 -
Touch Delete, then touch Yes.
The entry is deleted from the phonebook.
NOTE: If you do not want to delete the entry, touch No.
-
Repeat steps 4-5 to delete more entries; when you are finished, press
 .
.
Using the Online Printer Management Tool to edit the Fax Phonebook
You may use the Online Printer Management Tool to edit your fax phonebook. See Editing the fax phone book).
Previous Next