KODAK ESP 3.2 and 3.2s All-in-One Printers — Extended User Guide
Table of Contents > Networking Your Printer > Connecting to a wireless network
2 Networking Your Printer
Connecting to a wireless network
To connect your printer to an 802.11b/g/n wireless (Wi-Fi) network, refer to the following information.
Before you connect
You need:
-
a wireless router.
-
to determine whether your wireless router supports Wi-Fi Protected Setup (WPS).
NOTE: If you have specific questions about your router, see your router manufacturer's documentation for more information.
Connecting to a wireless network using the Wi-Fi Setup Wizard
You can use the Wi-Fi Setup Wizard on the printer to connect to your wireless network. Use the procedure that is appropriate for your network setup.
Connecting to a non-WPS wireless router
To connect your printer to your wireless network, you need to know the network name, also called the Service Set Identifier (SSID). You can obtain your network name from the wireless router. See the manufacturer's documentation for more information.
If you have enabled security on your network, you also need to know the security string, which may be a Wired Equivalent Privacy (WEP) or a Wi-Fi Protected Access (WPA/WPA2) passphrase.
Record your network information using the correct uppercase and lowercase letters.
Network Name (SSID):
Security String (case-sensitive):
-
Press
 .
. -
Touch
 , then touch Network Settings.
 -
Touch Wi-Fi Setup Wizard.
NOTE: The Wi-Fi radio turns on automatically when you select Wi-Fi Setup Wizard.
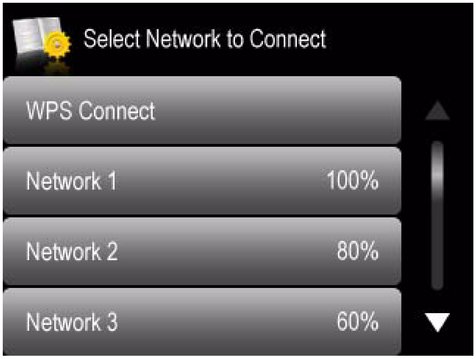
The Wi-Fi connectivity LED blinks as the printer searches for available wireless networks within range, then displays the list in order of signal strength. For example:
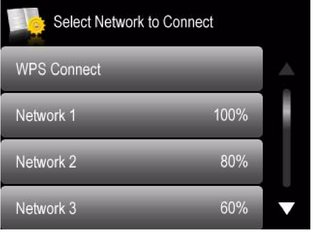
If there are additional networks than can be shown on the LCD, touch
 or
or  to view them.
 -
If the name of your network is:
Listed Not listed Touch your network name.
Make sure your wireless router is turned on and within range. If your wireless router does not broadcast its SSID (network name):
1. Touch
 , then touch Unlisted Network.
 2. Use the LCD keyboard to enter your network name, then touch OK.
3. Touch WEP or WPA/WPA2 as required for your network's security setup.
NOTE: If the name of your network is still not listed, or your want to change your network, touch  , then touch Rescan for Wireless Networks.
-
If your network has security enabled, use the LCD keyboard to enter your security string.
-
When the confirmation message appears, touch OK.
When the printer is successfully connected, the Wi-Fi connectivity LED stops blinking and remains lit.
The printer with a wireless connection is listed as the name of the printer plus a number (for example, KodakESP3.2+xxxx).
-
If you haven't installed the KODAK All-in-One Printer Software:
-
Go to www.kodak.com/go/esp3_2downloads (for ESP 3.2 Printers) or www.kodak.com/go/esp3_2sdownloads (for ESP 3.2s Printers).
-
In the search results, click the link for KODAK All-in-One Printer Software for your computer operating system.
-
Follow the on-screen instructions.
-
Connecting to a WPS wireless router
If your router supports Wi-Fi Protected Setup (WPS), you can use WPS Connect. WPS lets you configure your printer for a wireless network by pressing buttons or entering a PIN.
-
Press
 .
. -
Touch
 , then touch Network Settings.
 -
Touch Wi-Fi Setup Wizard.
NOTE: The Wi-Fi radio turns on automatically when you select Wi-Fi Setup Wizard.
-
Touch WPS Connect.
-
Select one of two methods of connecting:
IMPORTANT: Before you make a selection on the printer, make sure you know where the router's push button is, or where to enter the generated PIN. If necessary, consult your Internet service provider or router device manufacturer's documentation for more information.
Push Button Configuration Generate WPS PIN NOTE: You will have two minutes to press or select the WPS button. It may be a button on the device or a virtual button in the device's software.
-
Touch Push Button Configuration.
-
Press or select the WPS button for your wireless router.
-
Touch OK on the control panel.
-
Touch Generate WPS PIN.
-
Record the PIN from the printer LCD.
-
In your wireless router's software, locate the PIN screen.
-
Enter the PIN you received on the LCD into the PIN screen, then follow the router's instructions.
-
Touch OK on the control panel.
-
-
When the confirmation message appears, touch OK.
When the printer is successfully connected, the Wi-Fi LED will stop blinking and remain lit.
-
If you haven't installed the KODAK All-in-One Printer Software:
-
Go to www.kodak.com/go/esp3_2downloads (for ESP 3.2 Printers) or www.kodak.com/go/esp3_2sdownloads (for ESP 3.2s Printers).
-
In the search results, click the link for KODAK All-in-One Printer Software for your operating system.
-
Follow the on-screen instructions.
-
Setting up an IP Address
| IMPORTANT: | You should only need to set up an IP Address for your printer if you are having a problem with connecting to your network. Typically, it is not necessary to set up an IP Address. This procedure is for advanced users who know how to obtain the IP Address for the printer. |
-
Press
 .
. -
Touch
 , then touch Network Settings.
 -
Touch Advanced IP Address Setup.
-
Touch Yes to continue.
-
Touch one of the following:
-
Dynamic (DHCP)
-
Manual (Static)
-
-
If you selected Manual (Static), you are prompted to enter an IP Address, a Subnet Mask, a Gateway Address, and a DNS Server address. Touch OK after each entry. Use the navigation buttons to enter each digit.
Consult your Internet service provider or network administrator for more information.
Viewing the network configuration
To view the network configuration and verify that you are connected to your wireless network:
-
Press
 .
. -
Touch
 , then touch Network Settings.
 -
Touch View Network Configuration.
The Network Configuration settings appear on the LCD, including:
-
Printer Hostname
-
Connection
-
Speed
-
IP Address
-
IP Address Type
-
Network Subnet
-
Connected Network SSID
-
Access Point MAC address
-
Security
-
Authentication
-
Channel
-
Region
-
Radio (on/off)
-
Wi-Fi Firmware Version
-
MAC Address
If the printer is connected to your network, you will see the network name and the word CONNECTED.
-
-
To scroll through the information, touch
 .
. -
When you are done, touch OK.
Printing the network configuration
-
Load plain paper into the printer. (See Loading plain paper.)
-
Press
 .
. -
Touch
 , then touch Network Settings.
 -
Touch Print Network Configuration.
Installing your printer on additional computers on the network
To add your printer to another computer(s) on your network, install the KODAK All-in-One Printer Software on each computer.
-
Go to www.kodak.com/go/esp3_2downloads (for ESP 3.2 Printers) or www.kodak.com/go/esp3_2sdownloads (for ESP 3.2s Printers).
-
In the search results, click the link for your operating system.
-
Follow the on-screen instructions.
Connecting to another KODAK All-in-One Printer
If you are connecting to a newer model printer (for example, you have a HERO 3.1 Printer and now you are adding an ESP 3.2 Printer), you must install the software for the newer model.
| NOTE: | When you install the new software, the printer driver for the HERO 3.1 Printer will be uninstalled, and an upgraded driver for the HERO 3.1 Printer will be installed in addition to the driver for the ESP 3.2 Printer. |
On a computer with WINDOWS OS:
-
Select Start > All Programs > Kodak > Kodak Printer Setup Utility.
-
If your wireless printer (example: KodakESP3.2+xxxx) is not listed:
-
Select No, my printer is not listed, then click Next.
-
From the drop-down list, select your printer, then click Next.
-
Select Network - Wireless[thinsp]/[thinsp]Wi-Fi, then click Next. When your printer is detected, driver installation begins.
-
-
If your wireless printer (example: KodakESP3.2+xxxx) is listed:
-
Select the printer that is connected to your network, then click Next.
-
Select Yes, my printer is listed, then click Next. When your printer is detected, driver installation begins.
-
-
-
When driver installation is complete, click Done.
On a computer with MAC OS:
-
Select Apple > System Preferences.
-
Under Hardware, select Print & Fax or Print & Scan.
-
Click + in the dialog box.
-
Select your printer from the list.
-
Click Add, if required.
Previous Next