Zoom and pan the preview image
The preview screen defaults to a view of the entire scanner glass area.
1 To zoom in on the image area of your scan, use the zoom tool.
2 Once you have zoomed in, click and drag inside the preview area to reposition the image.
Adjust the scan crop
1 Select Fix Scan.
2 Adjust the crop of each scanned image.
a) Select a the shape of the crop box.
Note: Choose a shape that matches a specific print size, or a free-form crop box.
b) Click and drag anywhere inside of the crop box to move the box.
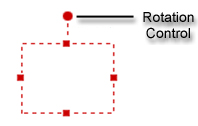
c) Click and drag the squares of the red crop box to resize it. Click and drag the circle to rotate the box.
Note:
You may need to reduce the size of the crop box to access the rotation
tool.
You can add another crop box to designate an additional image in the scan.
1 Select a crop box shape to add.
Note: Choose a shape that matches a specific print size, or a free-form crop box.
2
Click  to add the new crop box.
3 If necessary, rotate or delete a crop box:
|
|
Rotate the selected crop box 90 |
|
|
Delete the selected crop box. |


Revise the scan resolution
Select a different resolution from the drop-down list, if necessary.
Note: Increase the resolution for a higher quality scan. Picture scans completed at 1200 dpi or higher cannot be sent directly to the printer; they must be saved to a file first.
Apply or Remove Perfect Page Technology*
Perfect Page Technology corrects your scanned images to look better than the original.