Kodak EasyShare photo printer 500 — User's Guide
Table of Contents > Using the photo printer with a computer > Connecting to a computer
4 Using the photo printer with a computer
Connecting to a computer
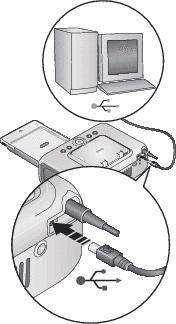
| IMPORTANT: | Make sure your camera or other device is NOT connected when you connect the photo printer to the computer. |
|
|
|
|
|
|
|||
|
2.
Plug the labeled
 end of the USB cable (included) into the labeled USB port on your computer. See your computer documentation for details. end of the USB cable (included) into the labeled USB port on your computer. See your computer documentation for details. |
|||
|
3.
Plug the other end of the USB cable into the square USB connector on the back of the photo printer.
|
|||
|
4.
Mac OS X—
Add the printer to your computer (Mac OS 10.2.8 - 10.3.9)
|
|||
Previous Next