KODAK EASYSHARE MD41 Digital Camera — Extended user guide
Table of Contents > Working with pictures/videos > Using the menu button in review
3 Working with pictures/videos
Using the menu button in review
-
Press the Review
 button, then the Menu
  button.
 -
Press
 to highlight a tab:
 -
Review
-
Edit
-
Setup
-
-
Press
 to highlight a setting, then press OK.
 -
Highlight an option, then press OK.
| IMPORTANT: | Your camera offers a built-in Help system. Getting help from your camera. |
Adding a date stamp to pictures
You can imprint a date stamp on pictures.
-
Press the Review
 button.
 -
Press
 to locate a picture.
 -
Press the Menu
 button, then
  to highlight the Edit tab.
 -
Press
 to highlight Add Date Stamp, then press OK.
 -
Follow the prompts to save the stamped picture.
| NOTE: | To remove a date stamp, crop it or use an image editing program. You cannot add a date stamp to Panoramic pictures or videos. To set the camera's date/time, Setting the language and date/time. |
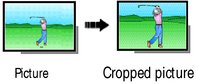
Cropping pictures
You can crop a picture so that only the desired portion of the picture remains.
|
|
|
|
|
|
1.
Press the Review
 button, then button, then  to find a picture to crop. to find a picture to crop. |
||
|
2.
Press the Menu
 button, then button, then  to highlight the Edit tab. Highlight Crop, then press OK. to highlight the Edit tab. Highlight Crop, then press OK. |
|||
|
3.
Press Telephoto (T) to zoom in, or
 to move the crop box. Press OK. to move the crop box. Press OK. |
|||
|
4.
Follow the screen prompts.
The picture is cropped. (The original is saved.) Cropped pictures cannot be cropped again on the camera. |
|||
-
Press the Review
 button to exit review.
| IMPORTANT: | Your camera offers a built-in Help system. Getting help from your camera. |
Using KODAK PERFECT TOUCH Technology
KODAK PERFECT TOUCH Technology helps ensure better, brighter pictures. PERFECT TOUCH Technology is automatically applied to pictures taken in Smart Capture mode. (You cannot apply PERFECT TOUCH Technology to videos, panoramic pictures, or pictures to which PERFECT TOUCH Technology is already applied.)
-
Press the Review
 button, then
  for previous/next picture.
 -
Press the Menu
The enhancement is previewed. Press button, then
  to highlight the Edit tab. Highlight PERFECT TOUCH Tech, then press OK.
  to view other parts of the picture.
-
Press OK. Follow the screen prompts to replace the original picture or to save the enhanced picture as a new one.
-
Press the Review
 button to exit review.
Copying pictures/videos
You can copy pictures/videos from a card to internal memory or from internal memory to a card.
Copy pictures/videos:
-
Press the Review
 button.
 -
Press the Menu
 button, then
  to highlight the Edit tab.
 -
Press
 to highlight Copy, then press OK. Highlight a choice, then press OK.
| NOTE: | Pictures/videos are copied, not moved. To remove pictures/videos from the original location after copying, delete them (see Deleting pictures/videos). |
| IMPORTANT: | Your camera offers a built-in Help system. Getting help from your camera. |
Editing videos
You can do incredible things with your videos.
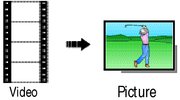
Making a picture from a video
You can choose a single frame from a video, then make a picture suitable for a 4 x 6-inch (10 x 15 cm) print.
|
|
|
|
|
|
1.
Press the Review
 button, then button, then  to find a video. to find a video. |
||
|
2.
Press the Menu
 button, then button, then  to highlight the Edit tab. Highlight Make Picture, then press OK. to highlight the Edit tab. Highlight Make Picture, then press OK. |
|||
|
3.
Follow the screen prompts.
A picture is created. (The original video is saved.)
|
|||
 button to exit review.
 | IMPORTANT: | Your camera offers a built-in Help system. Getting help from your camera. |
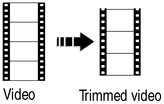
Trimming a video
You can remove an unwanted start or end from a video, saving only the desired portion.
|
|
|
|
|
|
1.
Press the Review
 button, then button, then  to find a video. to find a video. |
||
|
2.
Press the Menu
 button, then button, then  to highlight the Edit tab. Highlight Trim, then press OK. to highlight the Edit tab. Highlight Trim, then press OK. |
|||
|
3.
Follow the screen prompts.
The video is trimmed. (You can save it as a new video or replace the original.)
|
|||
 button to exit review.
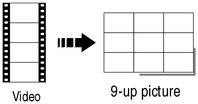
 Making a video action print
From a video, you can make a 9-up picture, suitable for a 4 x 6-inch (10 x 15 cm) print.
|
|
|
|
|
||||
|
1.
Press the Review
 button, then button, then  to find a video. to find a video. |
||||||
|
2.
Press the Menu
 button, then button, then  to highlight the Edit tab. Highlight Action Print, then press OK. to highlight the Edit tab. Highlight Action Print, then press OK. |
|||||||
|
3.
Highlight an option, then press OK.
|
|||||||
-
Press the Review
 button to exit review.
| IMPORTANT: | Your camera offers a built-in Help system. Getting help from your camera. |
Previous Next