Kodak EasyShare DX7440 zoom digital camera — User's guide
Table of Contents > Taking pictures and videos > Camera modes
2 Taking pictures and videos
Camera modes
| Use this mode | For |
|---|---|
|
|
General picture-taking. Automatically sets exposure, focus, and flash. |
|
|
Point-and-shoot simplicity when taking pictures under 16 special conditions. (See Scene modes.) |
|
|
Controlling exposure compensation (how much light enters the camera) and flash compensation. The camera automatically sets the shutter speed and aperture (f-stop) based on the scene lighting. Program mode offers the ease of auto shooting with full access to all menu options. Use the jog dial to select settings. (See P, A, S, M, and C mode and Using the jog dial to change P, A, S, M, or C mode settings.) Press the Menu button to change other settings. |
|
|
Controlling aperture, exposure compensation, flash compensation, and ISO speed. Aperture priority mode is primarily used to control depth of field (the range of sharpness).NOTE: The aperture setting may be affected when using optical zoom. Use the jog dial to select settings. (See P, A, S, M, and C mode and Using the jog dial to change P, A, S, M, or C mode settings.) Press the Menu button to change other settings. |
|
|
Controlling the shutter speed, ISO speed, flash compensation, and exposure compensation. The camera automatically sets the aperture for proper exposure. Shutter priority mode is primarily used to prevent blur when your subject is moving. Use the jog dial to select settings. (See P, A, S, M, and C mode and Using the jog dial to change P, A, S, M, or C mode settings.) Press the Menu button to change other settings. To prevent camera shake, use a tripod for slow shutter speeds. |
|
|
Enjoying the highest level of creative control. You set the aperture, shutter speed and ISO speed. Exposure compensation acts as an exposure meter, recommending the proper combination of aperture and shutter speed to produce an acceptable exposure. Use the jog dial to select settings. (See P, A, S, M, and C mode and Using the jog dial to change P, A, S, M, or C mode settings.) Press the Menu button to change other settings. To prevent camera shake, use a tripod for slow shutter speeds. |
|
|
The "user-created" mode. For applying P, A, S, & M plus any Custom settings (exposure compensation, flash compensation, ISO speed) which are saved independently of other camera settings. Use the jog dial to select settings. (See P, A, S, M, and C mode and Using the jog dial to change P, A, S, M, or C mode settings.) Press the Menu button to choose a capture mode. (See .) Press the Menu button to change other settings. |
|
|
Viewing your favorites. (See Tagging pictures as favorites.) |
|
|
Capturing video with sound. (See Taking a video.) |
 Auto
Auto
 Scene
Scene
 Program
 Aperture Priority
 Shutter Priority
 Manual
 Custom
 Favorites
 Video
Video
Scene modes
-
Turn the Mode dial to Scene
 .
. -
Press

 to display Scene mode descriptions.
 -
Press the OK button to choose a Scene mode.
| Use this SCN mode | For |
|---|---|
|
|
Full-frame pictures of people and other subjects. |
|
|
Subjects that are in motion. Shutter speed is fast. |
|
|
Distant scenery. Flash does not fire. Auto-focus framing marks (Using the auto-focus framing marks) are not available in Landscape. |
|
|
Subjects closer than 28 in. (70 cm). |
|
|
Capturing subject and background at night. Place the camera on a flat, steady surface or use a tripod. Due to slow shutter speeds, advise people to stay still for a few seconds after flash fires. |
|
|
Distant scenery at night. Place the camera on a flat, steady surface or use a tripod. |
|
|
Bright snow scenes. |
|
|
Bright beach scenes. |
|
|
Documents, from 3.9 - 23.7 in. (10-60 cm). |
|
|
Fireworks. Place the camera on a flat, steady surface or use a tripod. |
|
|
Close-ups of flowers in bright light. |
|
|
Quiet occasions, like a wedding or lecture. Flash and sound are disabled. |
|
|
Close-ups of yourself, from 3.9 - 23.7 in. (10-60 cm). |
|
|
People indoors. |
|
|
Action pictures of children in bright light. |
|
|
Subjects that are in shadow or "backlit" (when light is behind the subject). |
 Portrait
 Sports
 Landscape
 Close-up
 Night Portrait
 Night Landscape
 Snow
Snow
 Beach
Beach
 Text
Text
 Fireworks
 Flower
 Manner
 Self Portrait
 Party
Party
 Children
 Backlight
P, A, S, M, and C mode
|
|
|
|
|

|
Aperture—also known as f-stop, controls the size of the lens opening, which determines the depth of field. Larger aperture settings (larger f-number) keep both foreground and background sharp; good for landscapes and well-lit conditions. Smaller aperture settings make the foreground sharp and background blurry; good for portraits and low-light conditions. The highest and lowest aperture settings may be affected by optical zoom. |
||
Shutter speed—controls how long the shutter stays open. A shaking hand icon  warns of slow shutter speeds. (To prevent camera shake, use a tripod for slow shutter speeds.) warns of slow shutter speeds. (To prevent camera shake, use a tripod for slow shutter speeds.) |
|||
|
Exposure Compensation—controls how much light enters the camera. Add or subtract up to 2 EV in 0.3 EV steps. If the picture is too light, decrease the setting; if it's too dark, increase the setting. |
|||
|
Flash Compensation—controls the flash brightness (brighter: +0.5, +1.0; less bright: -0.5, -1.0). You must be within flash range. Unavailable if flash setting is Off. |
|||
|
ISO—controls sensitivity of the camera sensor (80, 100, 200, 400, 800). Higher settings are more sensitive to light, but may produce unwanted "noise" in a picture. You can only use ISO 800 if you are in the 1.1 MP Picture Size setting. (See .) |
|||
Settings apply only in P, A, S, M, and C modes
Settings you change in P, A, S, or M modes apply only to pictures taken in P, A, S, and M modes. Settings you change in C mode apply only to pictures taken in C mode.
For example, if you change the Color Mode to Sepia while in P, A, S, or M mode, then Auto & Scene modes retain the default setting of Color.
| NOTE: | The settings, including Flash, are maintained for P, A, S, M, and C modes—even when you change modes or turn off the camera. Use Reset to Default (see ) to reset P, A, S, M, or C mode to its default setting. |
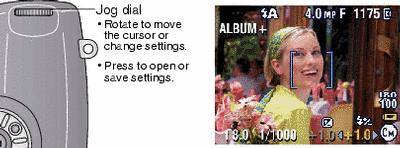
Using the jog dial to change P, A, S, M, or C mode settings
-
Turn the Mode dial to P, A, S, M, or C.
The mode settings are displayed. Available settings are white; unavailable settings are grey.
-
Use the jog dial:
-
Rotate the jog dial
 to move the cursor to a setting, such as
  .
. -
Press the jog dial to open the setting.
-
Rotate the jog dial
(Red settings are out of range and may cause unacceptable image/print quality. Adjust the value higher or lower until it turns yellow.) to change the value of the setting.
  .
.
-
Press the jog dial to save the setting.
-
-
Press the Menu button to change other settings. (See Changing picture-taking settings.)
-
Take a picture.
Previous Next