Kodak EasyShare printer dock series 3 — User's Guide
Table of Contents > Using the printer dock with a computer > Transferring pictures from a Kodak card reader
5 Using the printer dock with a computer
Transferring pictures from a Kodak card reader
The Kodak EasyShare printer dock series 3 is compatible with the Kodak 8-in-1 card reader and the Kodak 6-in-1 card reader (each sold separately). Other Kodak USB card readers may work with the printer dock; however, other manufacturers' card readers are not supported.

|

|

|

|
||
|
1.
Make sure Kodak EasyShare software is installed (see Installing the software) and the printer dock is connected to your computer (see Connecting to a computer).
|
|||||

|
2.
If a camera is docked, remove it.
|
||||
|
3.
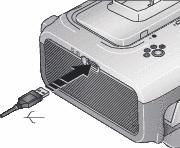
Plug the USB connector from the card reader into the USB connector located on the side of the printer dock.
|
|||||
|
4.
Insert the memory card into the card reader (see your card reader user's guide for details). Do not insert more than one card at a time.
|
|||||
|
5.
Press the Transfer button,
 , on the printer dock. , on the printer dock. Kodak EasyShare software opens on your computer (if it is installed). |
|||||
|
6.
Use Kodak EasyShare software to transfer pictures from the card reader to your computer. See the Kodak EasyShare software Help for details.
The printer dock Transfer light blinks while the pictures are being transferred. The Transfer light continues to blink until the Transfer or Print button is pressed, or until the connection is no longer available.
|
|||||
Purchase a Kodak card reader and other accessories at a retailer of Kodak products, or visit www.kodak.com/go/accessories.
Previous Next