Kodak EasyShare P880 zoom digital camera — User's guide
Table of Contents > Doing more with your camera > PASM and C modes
4 Doing more with your camera
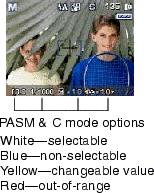
PASM and C modes
Settings you change in C modes apply only to pictures taken in those modes.
For example, if you change the Color Mode to Sepia while in C mode, you still retain the default setting of Color for Auto and SCN modes.
| NOTE: | The settings, including Flash, Exposure Metering, ISO, and White Balance are maintained for PASM and C modes—even when you change modes or turn off the camera. Use Reset Camera (see ) to reset PASM to its default setting. |

Changing PASM or C mode settings
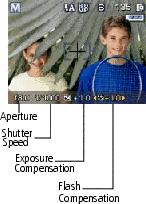
PASM and C modes control the f-number (aperture), shutter speed, exposure compensation, and flash compensation.
|
|
|
|
|
|
1.
Turn the Mode dial to P, A, S, M, or C.
|
||
|
2.
Use the Command dial and Set button:
|
|||
|
4.
Take a picture.
|
|||
 Menu on
 Using the white balance button
Choose your lighting condition.
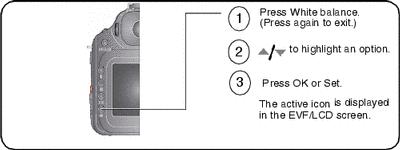
| NOTE: | This button is not available in Auto, SCN, and Video modes. |
| NOTE: | For rapid setting changes, see Using the command dial for rapid setting changes. |
White Balance (WB) options
| WB option | Description |
|---|---|
|
|
Automatically corrects white balance. Ideal for general picture-taking. |
|
|
Pictures in natural lighting. |
|
|
Under overcast, shady or twilight skies. |
|
|
Pictures in the shade in natural lighting. |
|
|
Preserves the deep hues seen in sunsets. |
|
|
Corrects the orange cast of household light bulbs. Ideal for indoor pictures under tungsten or halogen lighting without flash. |
|
|
Corrects the green cast of fluorescent lighting. Ideal for indoor pictures under fluorescent lighting without flash. |
|
|
Captures a representative white surface for a more precise setting. Follow the screen prompts for Setup. |
|
Custom
|
Uses a saved White balance setting that has been registered as a Custom white balance (see table on PASM and C menu options). |
 Auto (default)
  Daylight
  Cloudy
  Open shade
  Sunset
  Tungsten
  Fluorescent
  Click WB
Setting the ISO speed
The ISO speed controls sensitivity of the camera sensor. Higher settings are more sensitive to light, but may produce unwanted "noise" in a picture. Auto and SCN mode settings automatically adjust the camera sensitivity to the light conditions. Within PASM and C modes, the ISO button lets you adjust the setting.
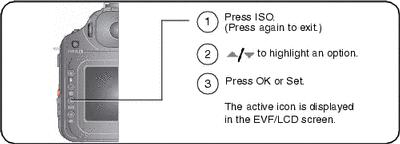
| NOTE: | For rapid setting changes, see Using the command dial for rapid setting changes. |
ISO speed setting for selected picture size:
| ISO | Picture size (MP) |
|---|---|
|
ISO 50–400 |
3.1 MP, 5.0 MP, 7.1 MP, and 8.0 MP |
|
ISO 400–1600 |
Available only in 0.8 MP |
| NOTE: | For selecting Picture size, see Still menu options. |
Using exposure metering
Choose a metering system in PASM or C mode for the appropriate lighting of your subject.
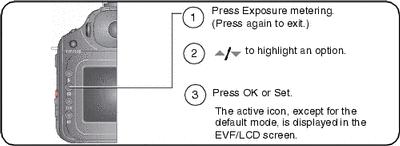
| NOTE: | For rapid setting changes, see Using the command dial for rapid setting changes. |
| Icon | Exposure metering options | ||||
|---|---|---|---|---|---|
|
|
|
||||
|
|
|
||||
|
|
|
||||
|
|
|


 to move the cross-hair graphic to the desired zone.
 Using exposure compensation with exposure bracketing
In PAS modes, you can use exposure compensation in conjunction with exposure bracketing.
| If exposure compensation is set to | And if the exposure bracketing interval is set to 3 steps | Then the exposures taken are |
|---|---|---|
|
0.0 |
Set the drive mode to Exposure bracketing 3 (see Using the drive mode for self-timer, burst, exposure bracketing). |
–0.3, 0.0, +0.3 |
|
+1.0 |
+0.7, +1.0, +1.3 |
|
|
–1.0 |
–1.3, –1.0, –0.7 |
Previous Next