Kodak ESP 3 All-in-One Printer — User Guide
Table of Contents > Product Overview > Main components of the ESP 3 All-in-One printer
1 Product Overview
Main components of the ESP 3 All-in-One printer
The graphics below show the printer scanner glass, automatic document feeder (ADF), control panel, LCD screen, and the door to the paper trays.

| Number | Component Name |
|---|---|
|
1 |
|
|
2 |
Control panel |
|
3 |
Memory card slots and memory card status light |
|
4 |
USB host port (for connecting PictBridge cameras, PTP cameras, and USB mass storage devices) |
|
5 |
|
|
6 |
Output tray extender |
|
7 |
Paper width guide |
|
8 |
|
|
9 |
USB device port (for connecting to the computer) |
|
10 |
Power connector |
|
11 |
Rear cleanout area |
|
12 |
Scanner glass |
|
13 |
Printhead |
USB Port
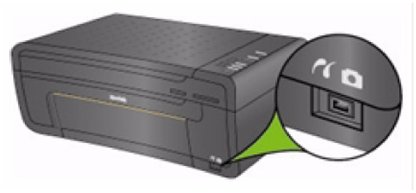
You can use the USB port on the front panel of the Kodak ESP 3 All-in-One printer to connect a PictBridge camera and print pictures directly from the camera. The Kodak ESP 3 All-in-One printer can access images from most digital cameras.
You can also use the USB port to access pictures on a USB device, such as a thumb drive, and transfer them to your computer.
Status Lights
The following tables provide information on the Kodak ESP 3 All-in-One printer status lights.
|
Light Status |
Cause |
Action / Solution |
|
All lights and displays are off |
|
|
|
All lights flash once |
The printer is initializing. |
None. Allow the printer to finish the initialization process. |
|
All lights are flashing and the On/Off light is flashing amber |
The printer has detected an error condition. |
Disconnect power for 5 seconds and reconnect power. If the condition persists, contact Kodak for assistance. |
|
Light Status |
Cause |
Action / Solution |
|
Check Color Ink
|
Normal operation. This light should be off when a color ink cartridge has been properly installed and has enough ink to print. |
None. |
|
Check Color Ink
|
The color ink cartridge ink level is low. |
Check the ink level in the Home Center or on the printer status monitor (Windows). |
|
Check Color Ink
|
The color ink cartridge needs to be replaced |
Replace the color ink cartridge. |
|
Check Color Ink
|
The color ink cartridge needs attention. |
Ensure that the color ink cartridge is installed properly. |
 light is off
  light blinks every few seconds
  light is flashing
  light is flashing rapidly
 |
Light Status |
Cause |
Action / Solution |
|
Off |
|
|
|
Steady Green |
The printer is properly powered up, on, and ready. |
None. You may start printing, copying, scanning, or other tasks. |
|
Flashing Green |
The printer is busy. |
None. Normal operation when performing a print, copy, scan, or other job request. |
|
|
The printer is initializing. |
None. Please wait and allow the printer to complete the initialization process (about 30 seconds). If the flashing green persists, you may have an issue with the printer. Visit Kodak.com for additional troubleshooting steps or contact your local Kodak Call Center. |
|
The printer is calibrating. |
None. Please wait and allow the printer to complete the calibration process (about 5 minutes). |
|
|
The printer is preparing to print, copy, or scan. |
None. |
|
|
Steady Amber |
The printer has detected an error condition. |
Disconnect power for 5 seconds and reconnect power. If the condition persists, check the Quantity display for additional codes. Contact Kodak for assistance.Check the status monitor (Windows) on your computer for a message. |
|
Flashing Red |
The printer has detected an error condition that needs your attention. |
Please check for other lights and follow the instruction for that light.Check the status monitor (Windows) on your computer for a message. |
|
Light Status |
Cause |
Action / Solution |
|
Check Black Ink
|
Normal operation. This light should be off when a black ink cartridge has been properly installed and has enough ink to print. |
None. |
|
Check Black Ink
|
The black ink cartridge ink level is low. |
Check the ink level in the Home Center or on the printer status monitor (Windows). |
|
Check Black Ink
|
The black ink cartridge needs to be replaced |
Replace the black ink cartridge. |
|
Check Black Ink
|
The black ink cartridge needs attention. |
Ensure that the black ink cartridge is installed properly. |
 light is off
  light blinks every few seconds
  light is flashing
  light is flashing rapidly
 |
Light Status |
Cause |
Action / Solution |
|
Check Paper
|
Normal operation. This light should be off when paper is properly loaded in the paper tray. |
None. |
|
Check Paper
|
The paper tray is out of paper, there is a paper jam, or the wrong size paper is loaded. |
Load the paper tray with paper, clear the paper jam, or load the correct size paper. Press Copy to continue. |
 light is off
  light is flashing red
 |
Light Status |
Cause |
Action / Solution |
|
Color light is on |
Indicates a document will be copied in color. |
Press Copy Color button to choose color or black and white output. |
|
Black light is flashing on |
Indicates a document will be copied in black and white. |
Press Copy Color button to choose color or black and white output |
|
Light Status |
Cause |
Action / Solution |
|
100% light is on |
Indicates a copied document or photo will match the size of the original as long as the loaded paper is the same size or larger. |
Press Copy Print Size button to choose 100% or Fit to Page. |
|
Fit to Page light is on |
Indicates a copied document or photo will fill the output page with the image, cutting off what won't fit. |
Press Copy Print Size button to choose 100% or Fit to Page. |
|
Light Status |
Cause |
Action / Solution |
|
1-9 |
Indicates the number of copies to be made. |
Press Quantity to select the number of copies you want to make. |
|
Flashing C |
Indicates that printhead calibration must be started. |
As needed, load the paper tray with plain paper (Letter-size or A4). Press the Copy button. |
|
Flashing E |
The printhead is not installed or not installed correctly. |
Remove any ink cartridges that may be installed. Remove the printhead and then re-install the printhead. Re-install the ink cartridges and close the lid. A new calibration sheet will print. |
Previous Next