KODAK PLAYTOUCH Video Camera, Model Zi10 — User guide
Table of Contents > Product Overview
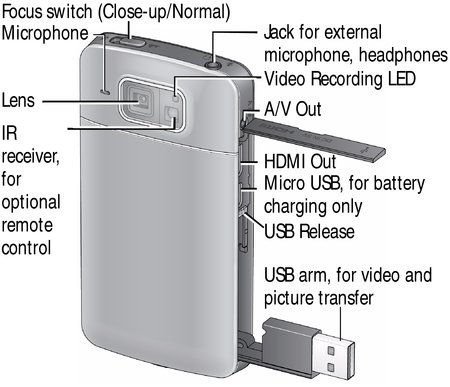
Front view
|
Download the Extended user guide |
|
Download the Extended user guide |
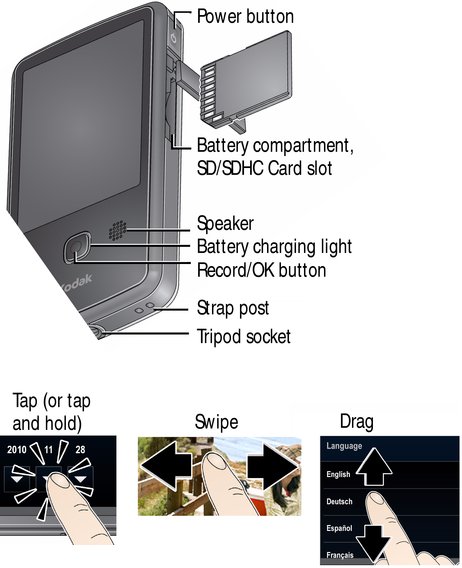
Back view, touchscreen gestures
|
Download the Extended user guide |
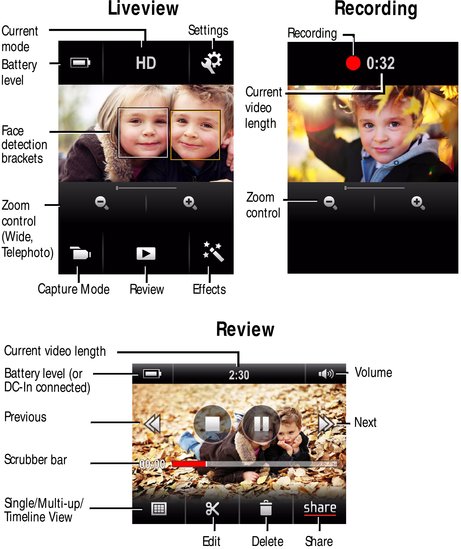
Understanding the status icons
|
Download the Extended user guide |
 Charging the battery
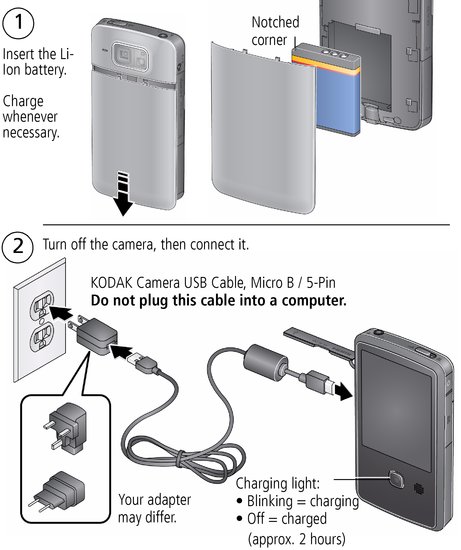
|
See other charging solutions |
|
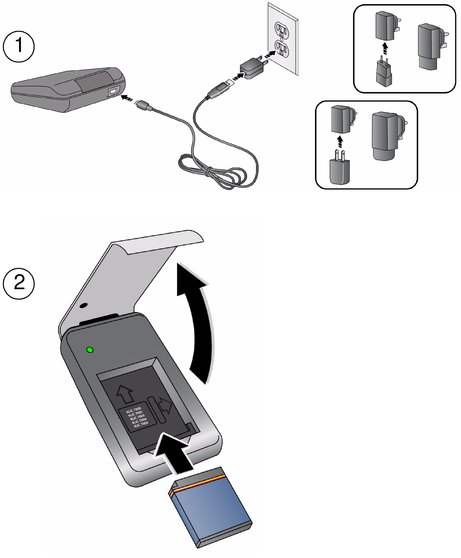
Charge using an external charger
A charger may be an optional accessory and differ from the one pictured.
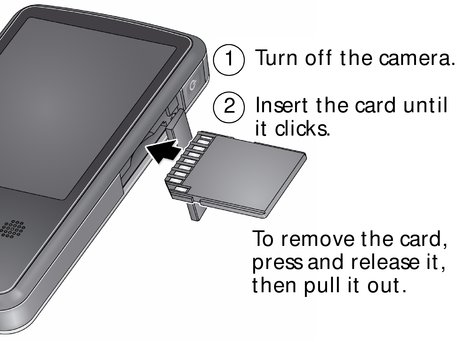
 Inserting an SD or SDHC Card
Your camera has limited internal memory—perfect for a few practice videos/pictures. We strongly suggest that you purchase an SD or SDHC Card. (Maximum supported card size is 32 GB.)

|
CAUTION: A card can only be inserted one way; forcing it may cause damage. Inserting or removing a card while the camera is on may cause damage. |
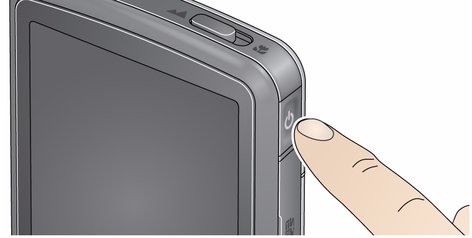
 Turning on the camera
 Setting the date/time
The first time you turn on the camera, you're prompted to choose your language and set the date/time. (To change your language or date/time in the future,
 .)
.)
|
|
|
|
|

|
To set the language: | ||
|
1.
Drag up/down to view your language. (For more information on using touchscreen gestures, Product views.)
|
|||
|
2.
Tap your language.
|
|||
|
|
|
|
|

|
To set the date: | ||
|
1.
Tap
 to scroll through month, date, year. (Tap/hold to scroll quickly.) to scroll through month, date, year. (Tap/hold to scroll quickly.) |
|||
|
2.
Tap MDY to change the date format.
|
|||
|
3.
The time screen is below the date screen. Drag up to view and set the time. (For more information on using touchscreen gestures, Product views.)
|
|||
|
|
|
|
|

|
To set the time: | ||
|
1.
Tap
 to scroll through hour and minute. (Tap/hold to scroll quickly.) to scroll through hour and minute. (Tap/hold to scroll quickly.) |
|||
|
2.
Tap AM to choose AM or PM.
|
|||
|
3.
Tap X to accept.
|
|||
 Recording videos, taking pictures
|
|
|
|
|

|
|
||
Enhancing your experience
|
|
|
|
|

|
|
||
|
|||
|
|||
|
|||
|
|||
 .
.  to choose an effect.
 Reviewing videos/pictures
|
|
|
|
|

|
1.
Tap the Review icon
 . (You can rotate the camera right or left, according to your preference.) . (You can rotate the camera right or left, according to your preference.) |
||
|
2.
For previous/next video/picture, swipe or tap the left/right side of the LCD.
|
|||
|
3.
To play a video, tap the Play icon.
|
|||
|
4.
To delete a video/picture, tap
 , then follow the prompts. , then follow the prompts. |
|||
Enhancing your experience
-
Use the sharing features (Sharing via social networking sites).
-
Use the editing features (Editing videos).
-
View videos/pictures as thumbnails and select them for sharing. (See the Extended user guide www.kodak.com/go/manuals.)
-
Plug in headphones, then tap Headphone.
-
Access the Volume controls; tap the volume icon
 .
.
| NOTE: | To switch to recording mode, press the Record/OK button. |
 Downloading software
When you connect the camera to the computer, you can download ARCSOFT MEDIAIMPRESSION for KODAK Software (for WINDOWS OS-based computers), the KODAK Camera Setup App (for WINDOWS and MAC OS), or both.
| NOTE: | If running MAC OS, you can also use the APPLE iLIFE suite of products. |
|
|
|
|
|

|
1.
Make sure the computer is connected to the Internet.
|
||
|
2.
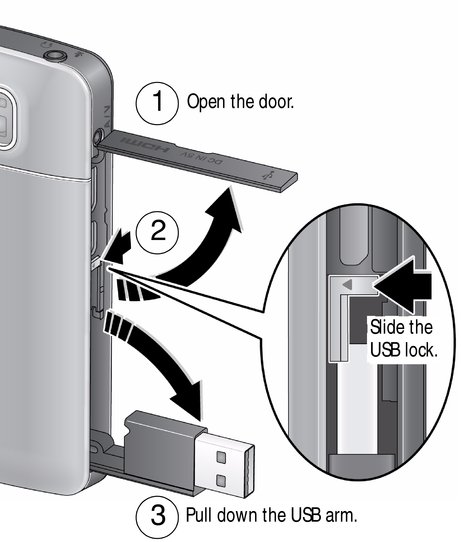
Use the USB arm to connect the camera. (It turns on automatically.)
|
|||
|
3.
Follow the prompts to install your choice of software.
You can now transfer and share videos/pictures on your computer.
|
|||
|
For help using ARCSOFT Software |
|
|
For help installing software and transferring videos/pictures |
Previous Next