KODAK OFFICE HERO 6.1 All-in-One Printer — Extended User Guide
Table of Contents > Networking Your Printer > Connecting to an Ethernet network
2 Networking Your Printer
Connecting to an Ethernet network
Before you connect, you need:
-
an Ethernet network that includes a router, switch, or hub with an Ethernet port.
-
a Category 5 (or higher) Ethernet cable.
-
to temporarily disable your firewall until the printer is successfully installed and communicating.
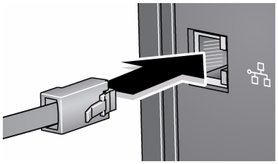
To connect to an Ethernet network:
-
Connect the Ethernet cable to the Ethernet port on the back of the printer.
-
Connect the other end of the Ethernet cable to an available Ethernet port on your router, switch, or hub.
-
If you haven't yet installed the KODAK All-in-One Printer Software, insert the CD that came with the printer into the computer CD drive, and follow the on-screen instructions. When the software checks for updates, if a newer version exists, install the newer version. (On a computer with MAC OS, be sure to select the option to check for newer versions.)
NOTE: If you do not have the CD:
-
In the results list, click the link for KODAK All-in-One Printer Software for your computer's operating system.
-
Follow the on-screen instructions.
Previous Next