KODAK PALMPIX Camera for the PALM m500 Handheld Series — User's Guide
Table of Contents > KODAK PALMPIX Camera Software > Customizing the HOTSYNC Transfer Settings
2 KODAK PALMPIX Camera Software
Customizing the HOTSYNC Transfer Settings
From your computer, you can change the following settings that determine how and where your pictures are saved on your computer:
| Setting | Options | System Default |
|---|---|---|
|
HOTSYNC action |
Handheld overwrites desktop Do nothing |
Handheld overwrites desktop |
|
After HOTSYNC operation |
Delete pictures off PDA Open picture folder |
Not checked Checked |
|
Save Pictures As |
PC: JPEG, BMP |
JPEG |
|
MACINTOSH Computer: JPEG, PICT |
JPEG |
|
|
Save Pictures Here |
On a PC: C:\KODAK Pictures\ PalmPix\username C:\Palm\username\ PalmPix User-specified directory |
On a PC: hard drive letter\Kodak Pictures\PalmPix\user name |
|
On a MACINTOSH computer: KODAK Picture Folder Palm User Directory User-specified |
On a MACINTOSH Computer: HD:Kodak Pictures:PalmPix:username |
Changing the Transfer Settings on a PC
-
On your computer desktop, right-click the HOTSYNC Manager icon
 , located in the System Tray on the WINDOWS desktop. Select Custom to display the Conduit's Custom Window.
NOTE: For information about the Conduit windows, refer to the guides that came with the PALM Handheld.
-
Select KODAK PALMPIX, then click Change.
-
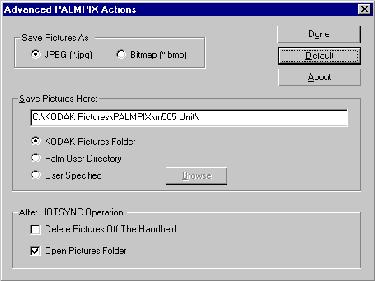
On the Change HotSync Action window, select the desired image transfer option. Click Advanced.
-
In the Advanced PalmPix Actions window, select the options you want, then click Done.
Changing the Transfer Settings on a MACINTOSH Computer
-
From the Finder Menu bar, select the PALM Icon.
NOTE: For information about the Conduit windows, refer to the guides that came with the PALM Handheld.
-
Select HotSync (with your user name), then Conduit Settings.
-
Select KODAK PALMPIX Camera. Click Change Settings.
-
Click Advanced. In the Advanced PalmPix Actions window, select the options you want, then click Done.

Previous Next