KODAK EASYSHARE CX4300 Digital Camera — User's Guide
Table of Contents > Taking Pictures—Capture Mode > Changing Picture-Taking Options
2 Taking Pictures—Capture Mode
Changing Picture-Taking Options
Use the Capture menus to change picture-taking options. If you are in Review, Share, or Setup modes you must return to Capture mode before you can access the Capture menus.
To Return to Capture From Another Mode
To return to Capture from:
-
Any mode, press the Shutter button to take a picture and revert to Capture.
-
Review mode, press the Review button.
-
Share mode, press the Share button.
-
Setup mode, and you got there from Capture, press the Menu button.
-
Setup mode, and you got there from Review mode, press the Menu button.
To Access the Capture Menu
-
In Capture mode (LCD is blank, no picture is displayed), press the Menu button.
-
Press the Menu button to turn off the menu.
| Capture Menus | |||
|
|
Close-up (Taking Close-up Pictures) |
|
Quality (Setting Picture Quality) |
|
|
Self Timer (Putting Yourself in the Picture) |
|
Date Stamp (Placing the Date on Pictures) |
|
|
Image Storage (Choosing Internal Memory or MMC/SD Card) |
|
Orientation Sensor (Setting the Orientation Sensor) |
|
|
Exposure Compensation (Setting Exposure Compensation) |
|
|


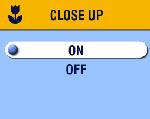
Taking Close-up Pictures
The Close-up setting helps you gain sharpness and detail at close range. The Close-Up focus distance is 5.9 to 19.7 in. (150 to 500 mm).
|
|
|
|
|
|
To turn on Close-up: | ||
|
1.
In Capture mode, press the Menu button.
|
|||
|
2.
Highlight Close-up
 , then press the OK button. , then press the OK button. |
|||
|
3.
Highlight On, then press the OK button.
|
|||
|
4.
Press the Menu button to turn off the menu screen.
The Close-up icon  appears in the status bar and the LCD automatically enters Liveview. appears in the status bar and the LCD automatically enters Liveview.
|
|||
|
5.
Use the LCD to frame your subject and take the picture as usual.
|
|||
The Close-up setting turns off when you turn off the camera.
| NOTE: | If the flash is set to Red-eye when you turn on Close-up, the flash setting changes to Auto; the flash then changes back to Red-eye when you turn off Close-up. |
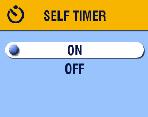
Putting Yourself in the Picture
The Self Timer creates a 10-second delay between the time you press the Shutter button and the time the picture is taken.
|
|
|
|
|
|
1.
In Capture mode, press the Menu button.
|
||
|
2.
Highlight Self Timer
 , then press the OK button. , then press the OK button. |
|||
|
3.
Highlight On, then press the OK button.
|
|||
|
4.
Press the Menu button to turn off the menu screen.
|
|||
|
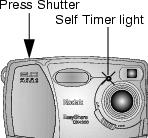
5.
Place the camera on a flat surface or use a tripod.
|
||
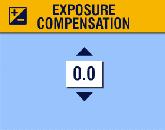
Setting Exposure Compensation
Use Exposure Compensation to control how much light is allowed into the camera. The exposure range is +2 to -2 in 1/2-step increments.
| NOTE: | This setting is ideal for controlling pictures in which the light source is behind the subject (backlit), or for correcting pictures that are too light or too dark. |
|
|
|
|
|
|
1.
In Capture mode, press the Menu button.
|
|||
|
2.
Highlight Exposure Compensation
 , then press the OK button. , then press the OK button. |
|||
|
3.
Press
 to select the Exposure Compensation setting. to select the Exposure Compensation setting.
|
||
|
4.
Press the OK button to accept the change and return to the menu screen.
|
|||
|
5.
Press Menu to exit the menu screen.
This setting remains until you change it. |
|||
 to decrease (-) the value.
  to increase (+) the value.
 Setting Picture Quality
Use the Quality setting to select a picture resolution:
|
|
|
|
|
||||
|
1.
In Capture mode, press the Menu button.
|
|||||||
|
2.
Highlight Quality
 , then press the OK button. , then press the OK button. The active Quality setting appears in the top left corner. |
|||||||

|
3.
Highlight an option:
|
||||||
|
4.
Press the OK button.
|
|||||||
|
5.
Press the Menu button to turn off the menu screen.
This setting remains until you change it. |
|||||||
 —(3.2 MP, low compression) for printing up to 11 x 14 in. (27.9 x 35.6 cm); produces highest picture resolution, more detail, and largest file sizes.
 appears in the status bar.
 —(3.2 MP, high compression) for printing up to 8 x 10 in. (20.3 x 25.4 cm); pictures are medium resolution with smaller file sizes.
 appears in the status bar.
 — (0.8 MP) for emailing or screen display; pictures are lowest resolution with smallest file sizes.
 appears in the status bar.
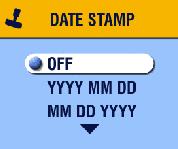
Placing the Date on Pictures
Use Date Stamp to imprint the date on your pictures.
|
|
|
|
|
|
2.
In Capture mode, press the Menu button.
|
|||
|
3.
Highlight Date Stamp
 , then press the OK button. , then press the OK button. |
|||
|
4.
Highlight an option:
|
||
|
5.
Press the OK button.
|
|||
|
6.
Press the Menu button to turn off the menu.
The current date is printed in the bottom right corner of new pictures. This setting remains until you change it. |
|||
Setting the Orientation Sensor
If you rotate the camera to take a picture (for example, a portrait shot), the Orientation Sensor rotates the picture so it is displayed correct side up during Quickview and Review.
The Orientation Sensor is turned on as the default. You can turn it off so that pictures are displayed in their original orientation.
| NOTE: | When your subject is above or below you (such as pictures of an object in the sky, on the ground, or when pointing down at small objects on a table), turn off the Orientation Sensor so that pictures are not rotated unnecessarily. |
-
In Capture mode, press the Menu button.
-
Highlight Orientation
 , then press the OK button.
 -
Highlight On or Off, then press the OK button.
-
Press the Menu button to turn off the menu.
This setting remains until you change it.
Previous Next