Kodak EasyShare photo printer 300 — User's Guide
Table of Contents > Printing from a computer > Connecting to a computer
4 Printing from a computer
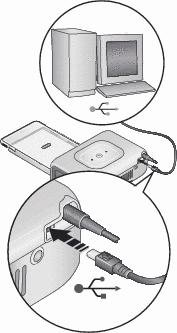
Connecting to a computer
|
|
|
|
|
|
2.
Plug the labeled
 end of the USB cable (included with the photo printer) into the labeled USB port on your computer. See your computer documentation for details. end of the USB cable (included with the photo printer) into the labeled USB port on your computer. See your computer documentation for details. |
||
|
3.
Plug the other end of the USB cable into the USB connector on the back of the photo printer.
|
|||
Printing with Kodak EasyShare software
We recommend using Kodak EasyShare software (included) for printing pictures from your computer. This software lets you take advantage of a wide range of features, including full color enhancement, red-eye reduction, picture organization, and more.
-
Make sure Kodak EasyShare software is installed (see Installing the software) and the photo printer is connected to your computer (see Connecting to a computer).
-
Click the My Collection tab.
-
Select the pictures you wish to print.
-
Click the Print at Home tab.
-
Make sure the photo printer is selected as the current printer.
-
Change any other settings, such as paper size and print layout, then click Print.
IMPORTANT: Wait until printing is complete before removing paper or the paper tray. Failure to do so can cause paper misfeeds or jams.
See the EasyShare software Help for details. For more information, and to download the latest version of EasyShare software, visit www.kodak.com/go/easysharesw.
Printing using other applications
-
Make sure the printer driver is installed (see Installing the software), and the photo printer is connected to your computer (see Connecting to a computer).
-
Open the pictures you wish to print in the application from which you want to print.
-
Access printer settings by selecting Print or Page Setup from the File menu (depending on your application and operating system).
-
Make sure the photo printer is selected as the current printer.
-
Change any other settings as needed, then click OK or Print. (Depending on your application and operating system, you may first need to return to the main menu and select Print from the File menu.)
IMPORTANT: Wait until printing is complete before removing paper or the paper tray. Failure to do so can cause paper misfeeds or jams.
Choosing a color mode
Kodak's color mode feature uses automatic color correction to help you make great-looking prints. The Kodak EasyShare photo printer 300 features three color mode options:
|
|
Enhanced - to get richer, more vivid colors. Natural - to get great, natural color for everyday picture-making. None - to disable automatic color correction. |
To change the color mode:
Windows 2000/XP OS:
-
From the Start menu, select Settings, then select Printers.
NOTE: Depending on your Start Menu configuration, you may need to select Printers and Faxes from the Control Panel.
-
Right-click the photo printer icon, then select Printing Preferences.
-
Click the Color Correction tab.
-
Select a color correction option, then click OK.
Windows 98/ME OS:
-
From the Start menu, select Settings, then select Printers.
-
Right-click the photo printer icon, then select Properties.
-
Click the Color Correction tab.
-
Under Color Correction, select a color mode option.
-
Click OK when complete.
Mac OS X:
-
Make sure the photo printer is selected as the current printer.
-
From an application File menu, select Print.
-
Select Color Control from the Copies & Pages pop-up menu.
-
Select Kodak color.
-
Select a color mode option.
Previous Next