Kodak EasyShare Z760 zoom digital camera — User's guide
Table of Contents > Taking pictures and videos > Taking a picture
2 Taking pictures and videos
Taking a picture
|
|
|
|
|
||
|
1.
Turn the Mode dial to Auto
 . (See Camera modes for other mode descriptions.) . (See Camera modes for other mode descriptions.) The camera screen displays the mode name and description. To interrupt the description, press any button. To redisplay the description, press the OK button. |
|||||
|
2.
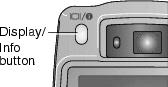
Press the Display/Info button to turn on the camera screen, or use the viewfinder to frame your subject.
|
||||
|
3.
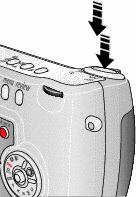
Press the Shutter button halfway to set the exposure and focus.
|
||||
|
4.
When the ready light turns green, continue pressing the Shutter button completely down to take the picture.
If the ready light is steady or blinking red, release your finger, recompose the scene, and return to Step 12. When the ready light blinks green, the picture is being saved; you can still take pictures.
|
|||||
Using the auto-focus framing marks
When using the camera screen as a viewfinder, framing marks indicate where the camera is focusing. For the best pictures, the camera attempts to focus on foreground subjects, even if the subjects are not centered in the scene.
-
With the camera screen on, press the Shutter button halfway and hold.
When the framing marks turn red, focus is accomplished.
While the shutter button is pressed halfway:
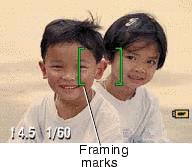
 Center focus
  Center wide focus
  Side focus
  Center and side focus
  Left and right focus
 -
Press the Shutter button the rest of the way down to take the picture.
-
If the camera is not focusing on the desired subject (or if the framing marks disappear and the Ready light blinks red), release your finger, recompose the scene, and return to Step 2.
| NOTE: | Framing marks do not appear in Landscape or Video mode. |
Changing the camera screen in Auto mode
|
If you want |
Then |
|
To turn the camera screen on or off |
Press the Display/Info button: |
|
The camera screen always on (or always off) in Auto mode |
See . |
Previous Next