Kodak ESP 9 All-in-One Printer — User Guide
Table of Contents > Handling Paper > Loading the paper trays
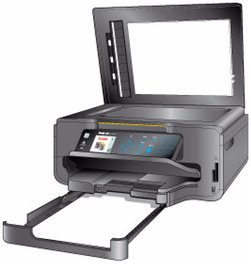
4 Handling Paper
Loading the paper trays
Things to keep in mind
-
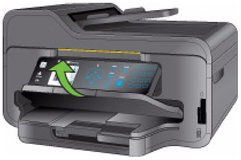
Before you start loading any type of media into the printer, lift the paper output tray.
-
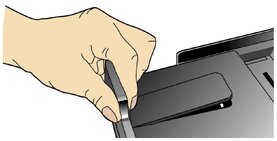
Pull the paper stop (at the edge of paper output tray) until it is fully extended.
-
If the paper you are going to use is less than A4 size, lift the hinged end of the paper stop toward you until it perpendicular to the paper stop. This prevents the printed paper from sliding off of the paper output tray as it exits the printer.
-
If the paper you use is longer than A4 size, including Legal and panoramic photo paper, make sure that the hinged end of the paper stop lays flat and is NOT pulled up. The longer paper should balance on the paper output tray without sliding off.

CAUTION:
This is crucially important when you are printing two or more sheets of long paper. Long paper that cannot extend straight to its full length when output from the printer can fold behind the object ahead of it. The curl can result in a job that dissatisfies you, and it can also causes a blockade preventing paper still being printed from exiting the printer properly. Although a paper curl should not interrupt a job involving just one sheet of long paper, when a sheet's clean exit from the printer is impeded because the sheet before it is curled by the paper stop, the current sheet also curls upon itself, generally behind rather than atop the sheet that came before. This process repeats until the trapped sheets jam the paper inside the printer.
-
Loading plain paper
| NOTE: | Review Things to keep in mind. |
|
|
CAUTION: The automatic document feeder (ADF) on the ESP 9 only accepts plain paper. |
-
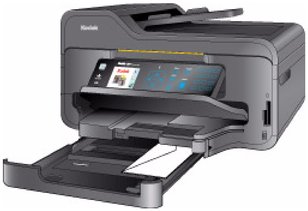
Pull the bottom paper tray toward you.
NOTE: To load media that is more than A4 size, such as 4X12 inch panoramic photo paper or legal plain paper, you must first extend the bottom paper tray to its full length. To do so:
-
Remove all paper from the tray, as needed.
-
Press and hold the paper tray extension-release, located on the inside of the front of the lower paper tray.
-
Pull the tray extension toward you gently until it stops moving easily. DO NOT pull the extension far enough to disengage from the paper tray.
-
Let go of the tray release, and then load the paper in the tray.

-
-
As needed, squeeze and slide the paper edge guide on the tray to the left so that it does not block the paper from laying flat.
-
Insert the media into the paper tray, print side down with its near edge against the paper stop.
-
As needed, squeeze and slide the paper edge guide to align it to the left edge of the media.
-
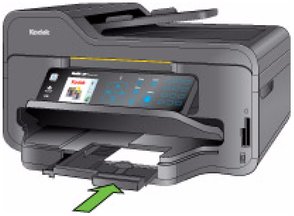
Lower the paper output tray.
-
Gently push the tray forward until it is aligned to the edge of the paper output tray.

Loading photo paper
| NOTE: | Review Things to keep in mind. |
|
|
CAUTION: The automatic document feeder (ADF) on the ESP 9 only accepts plain paper. If you try to run photo paper through it, the printer displays an error message on the LCD screen, and the printer will not complete the job. |
-
Remove all other paper from the paper tray you plan to use.
-
Insert photo paper into the paper tray print-side down, with the short edge forward. Do not overload the tray.
-
Slide the paper forward until it stops.
-
Squeeze the paper edge guide and slide it to the right until it just touches the loaded paper.
-
Lower the paper output tray.
-
Gently push the tray forward until it is aligned to the edge of the paper output tray.
Loading envelopes
|
|
WARNING: Do not load envelopes with cutouts or cellophane windows in this printer. |

| NOTE: | Review Things to keep in mind. |
-
Remove all other paper from the paper tray you plan to use.
-
Place one or more envelopes along the right edge of the paper tray, with the front side down and the envelope flaps pointing toward the left side of the tray.
-
Squeeze the paper edge guide and move it to the right until it just touches the loaded envelope(s).
-
Close the paper tray and lower the paper output tray.
Loading legal size paper
-
Remove all other paper from the bottom tray.
-
Press and hold the paper tray extension-release, located on the inside of the front of the bottom paper tray.

-
Pull the tray extension toward you gently until it stops moving easily. DO NOT pull the extension far enough to disengage from the paper tray.
-
Let go of the tray release and then load the paper in the tray.
-
Squeeze the paper edge guide and move it to the right until it just touches the loaded paper.
-
Squeeze the paper edge guide and move it towards the printer until it just touches the loaded paper.
-
Push the paper tray in towards the printer.
-
Press the bottom paper extender tab on the front left edge of the tray while pushing the paper tray in towards the printer.
Previous Next