Kodak ESP 5 All-in-One Printer — User Guide
Table of Contents > Printer Overview > Control panel layout
1 Printer Overview
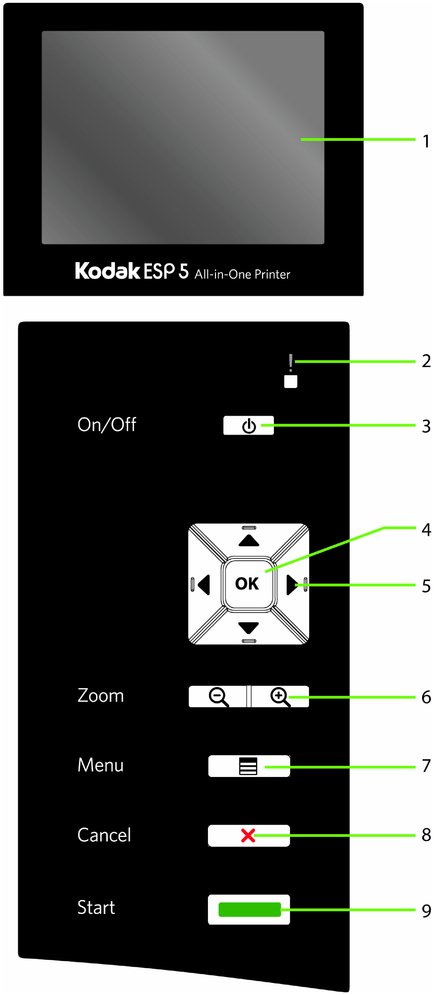
Control panel layout
The legend describing the numbered parts of the control panel illustration is in the table below.
| Number | Name | Description |
|
1 |
Screen |
Displays photos, messages, status, and menus. |
|
2 |
Blinks or flashes when an error occurs. |
|
|
3 |
Powers the printer ON or OFF. |
|
|
4 |
Enables you to complete a menu selection or photo print command, or allows you to continue with the current operation. |
|
|
5 |
Enables you to navigate menus and photos, and pan around a zoomed photo. |
|
|
6 |
Allows you to zoom in and out of the photo. |
|
|
7 |
Displays the menu, and toggles between the parameters and preview screens. |
|
|
8 |
Cancel button |
Cancels the current operation and control panel navigation, and returns you to the menu. |
|
9 |
Allows you to start the following operations: copy, scan, print, and transfer. |
| NOTE: | See Control Panel Screen for instructions on raising and lowering the control panel so that it is easier to use. |
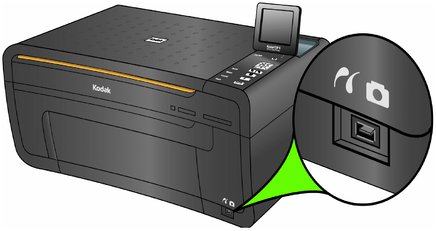
USB Port
This All-in-One printer works with most digital cameras. Using the USB port located on the front of the printer (see figure), you can connect the following devices to the printer:
-
PTP camera
-
USB flash drive
-
Kodak Bluetooth dongle
-
image-transfer cameras
-
mass storage cameras
Status Lights
The tables below describe the meaning of each light and condition, and offer tips on what action to take.
|
Light Status |
Cause |
Action / Solution |
|
OFF |
|
|
|
Blinking |
The printer is initializing or busy. |
None. Allow the printer to finish the initialization process. |
|
ON |
The printer is ready. |
None. |
|
Light Status |
Cause |
Action / Solution |
|
OFF |
|
|
|
ON |
The power supply is supplying power to the printer. |
None. |
|
Light Status |
Cause |
Action / Solution |
|
OFF |
Either the SD/MMC card is not inserted or is improperly inserted in the card slot. |
Remove and reinsert the SD/MMC card. |
|
Blinking |
The internal card reader is initializing or communicating with a memory card. |
None. |
|
ON |
An SD/MMC card is properly inserted in the card slot. |
None. |
|
Light Status |
Error |
|
OFF |
None |
|
Blinking Slow |
Paper jam.Paper tray empty.Paper carriage stall.Paper size or type mismatch.Change ink cartridge.Ink cartridge not readable.Printhead not calibrated.Unit open.Too many image sources.Printhead not installed.Unable to read device. |
|
Blinking Fast |
Ink cartridge(s) inserted incorrectly.Ink cartridge(s) not installed. |
|
ON |
Media sensor failure.Printhead failure.Scanner failure. |
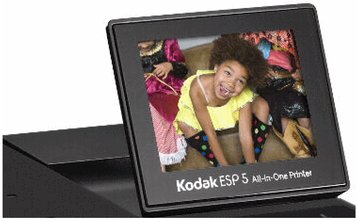
Control Panel Screen
The display screen can be adjusted to any position between upright and flush with the printer cover. It displays photos, messages, instructions, and menu items. You control the items displayed on the screen by pressing the 4-way navigation buttons on the control panel.
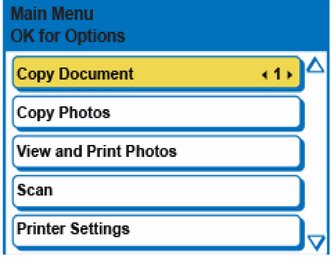
Using Menus
Use the menus displayed on the screen to select stand-alone tasks (that is, tasks that can be performed without your computer) such as copying documents or photos, or printing photos stored on memory cards or digital cameras plugged into the printer, or sending a Fax. You can also select tasks that will be completed on a computer connected to the printer, such as transferring photos from a memory card or connected camera to the computer.
The next page symbol  , located in the lower right corner, allows you to access the next page, while the previous page symbol
  , located in the top right corner, allows you to access the previous page.
Using the 4-way navigation buttons
-
Pressing
 highlights the next row down in the visible menu. When the last row in a menu is highlighted, pressing
  causes the visible page to be replaced with the following page in a multi-page menu, with the top row highlighted; in a one-page menu, this action highlights the top item.
 -
Pressing
 returns you to the previous page. Holding down any of the 4-way navigation buttons causes them to repeat the action until you release it.
 -
When a menu is displayed on the control panel screen, the selected row is highlighted. Instructions displayed at the top of the screen describe how to perform the task shown in the row by pressing either Start or OK. When there are two or more options for the setting shown on the selected row, each option is displayed between the Left (
 ) and Right (
  ) symbols. Pressing
  or
or  on the control panel displays the active choice.
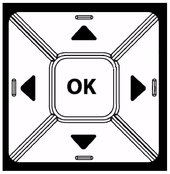
Previous Next