KODAK EASYSHARE Digital Frame / Decor Series — D725/D825/D1025 Extended user guide
Table of Contents > Getting started > Adding a new standard picture frame
1 Getting started
Adding a new standard picture frame
You can personalize your KODAK EASYSHARE Digital Frame by putting a standard picture frame over the digital frame's panel. Match your home décor and style by choosing from the hundreds of standard picture frames on the market, even a favorite you might already have.
Choosing a standard picture frame size
|
KODAK EASYSHARE Digital Frame model |
Use a standard picture frame that accommodates this photo size (without a matte) |
|
D725 D825 D1025 |
6 x 8 in. (15.2 x 20.3 cm) 8 x 10 in. (20.3 x 25.4 cm) 8 x 10 in. (20.3 x 25.4 cm) |
Standard picture frames have different attachment styles. Your digital frame fits these most commonly available styles of standard frames:
-
Slot—frames with a slot around the inside perimeter (Attach a slot-style standard picture frame)
-
Clip—frames with a rotating clip around the perimeter of the frame (Attach a clip-style standard picture frame)
-
Tab—frames with bendable metal tabs (Attach a bendable metal tab-style standard picture frame)
Picture frame styles that don't fit
Several standard picture frame styles are not compatible with your KODAK EASYHARE Digital Frame. A compatible standard picture frame must accept the dimensions of the digital frame's attachment area. The dimensions of the attachment areas are:
|
KODAK EASYSHARE Digital Frame model |
Digital frame's attachment area dimensions |
|
D725 D825 D1025 |
6 x 8 x 0.165 deep (15.2 x 20.3 x 0.4 cm) 8 x 10 x 0.165 in. deep (20.3 x 25.4 x 0.4 cm) 8 x 10 x 0.165 in. deep (20.3 x 25.4 x 0.4 cm) |
The following types of standard picture frames will not fit on your EASYSHARE Digital Frame.
-
Frames that secure a photo by pressing it between two pieces of glass.
-
A deep frame that's designed to hold 3-dimensional objects instead of photos.
-
Frames with inserts in which the insert holds the standard picture size.
-
Frames with a hinged or otherwise non-removable back.
-
Frames with a curved or uneven mounting surface.
-
Frames with a round, oval, or other non-rectangular mounting area.
-
Frames in which you slide the picture into one end.*
-
Handcrafted frames.*
* You may be able to use these frame types. Check for individual frame compatibility.
General attachment details
-
If the faceplate that was packaged with your frame is attached, remove it (Attaching the D725/D825 stand and faceplate).
-
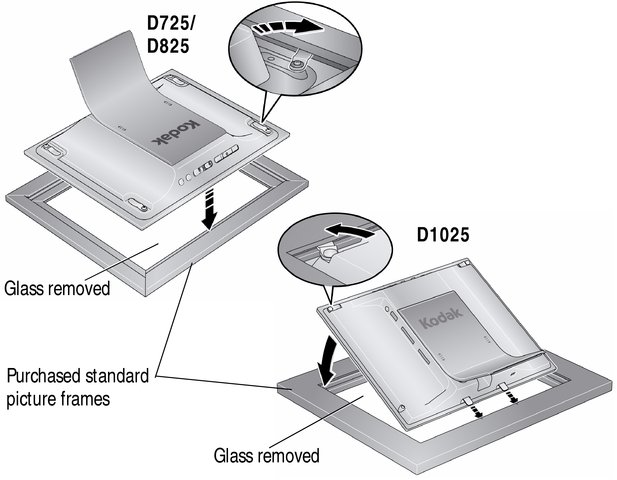
Remove the back, backing material, and the glass from the standard picture frame. Use CAUTION when handling the glass, the edges are sharp.
NOTE: You must remove the glass.
Store the original faceplate and contents of the standard picture frame in the box that came with your digital frame. Keep for later use.
-
Place the standard picture frame face down on a protected flat surface, and place the digital frame into the picture frame.
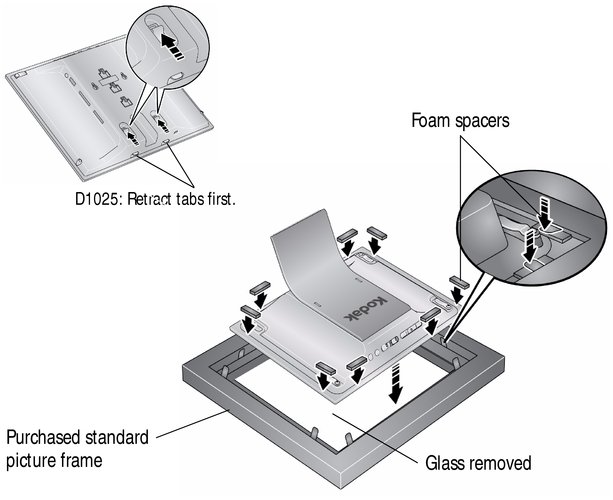
-
Attach the frames together according to the following directions. Keep any leftover foam spacers for later use.
-
When attached, make sure the digital frame is secure within the picture frame and can't shift or move around.
Attach a slot-style standard picture frame
SLOT-style
-
Use the clips that are attached to the digital frame's back panel.
-
Rotate and depress the clips as needed to engage the slot in the standard frame.
If necessary:
-
If a deep picture frame places the slot above the clips, carefully bend the clips up—slightly above the slot. Then, rotate and depress the clips to slide them into the slot.
-
Tighten the screws to secure the clips. Be careful not to over-tighten.
Attach a clip-style standard picture frame
CLIP-style

-
Use the clips that are attached to the standard picture frame.
-
Use the included self-stick foam spacers to fill any gap between the digital frame's back panel and the clips on the standard frame. Stack the spacers if necessary. Avoid adding more spacers than necessary to prevent excessive force against the clips.
If necessary:
-
Tighten the screws to secure the clips. Be careful not to over-tighten.
Attach a bendable metal tab-style standard picture frame
TAB-style
-
Bend the metal tabs down to secure the digital frame to the standard frame.
-
If necessary, use the included self-stick foam spacers to fill any gap between the digital frame's back panel and the metal tabs.
Previous Next