Kodak EasyShare printer dock plus series 3 — User's Guide
Table of Contents > Using your printer dock with a computer > Transferring pictures from the internal card reader
4 Using your printer dock with a computer
Transferring pictures from the internal card reader

|

|

|

|
||
|
1.
Make sure Kodak EasyShare software is installed (see Installing the software) and the printer dock is connected to your computer (see Connecting to a computer).
|
|||||
|
2.
Open the accessory door on the printer dock.
|
|||||
|
3.
If a digital camera is docked, remove it.
|
|||||

|
4.
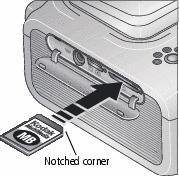
Orient the SD/MMC card as shown, then push the card into the card slot to seat the connector.
|
||||
|
5.
Press the Transfer button,
 , on the printer dock. , on the printer dock. Kodak EasyShare software opens on your computer (if it is installed). The printer dock Transfer light blinks while the pictures are being transferred. The Transfer light continues to blink until the Transfer or Print button is pressed, or until the connection is no longer available.
|
|||||
-
To remove the card, push it in, then release it. When the card is partially ejected, pull it out.
Previous Next
 .
.