Kodak EasyShare-One zoom digital camera — User's guide
Table of Contents > Using your camera with a Wi-Fi wireless network > Connecting to a Wi-Fi wireless network
6 Using your camera with a Wi-Fi wireless network
Connecting to a Wi-Fi wireless network
(For definitions of common wireless terms, see Glossary of common wireless network terms.)
Once connected to a Wi-Fi wireless network, you can use the wireless capabilities of your camera.
| NOTE: | The range of a typical Wi-Fi wireless network can vary between 100 to 300 ft (30 to 90 m), depending on signal obstructions or other interference. Make sure you are in the vicinity of the Wi-Fi wireless network you want to connect to. |
-
Slide the Capture/View switch to View
 .
. -
Insert a Kodak Wi-Fi card (may be sold separately) into the camera (see Inserting and deploying a Kodak Wi-Fi® card).
-
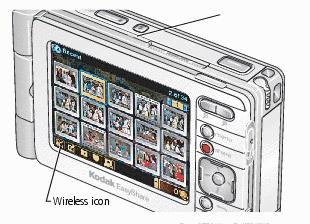
Deploy the Wi-Fi card (see Inserting and deploying a Kodak Wi-Fi® card). If the card is already deployed, touch the Wireless icon,
The wireless network status light (next to the Wi-Fi card slot) blinks amber as the camera scans for available networks. , located on the bottom toolbar to rescan for available networks.
-
If one or more wireless networks are available, the camera checks for a matching network name, or SSID, from the profiles stored in the camera (see Setting up a network profile):
-
If a matching SSID is found, and if the Connect Mode of the profile is set to Auto, the camera attempts to connect to the network.
-
If a matching SSID is found, and if the Connect Mode of the profile is set to Prompt, you must accept the connection before the camera attempts to connect to the network.
-
If a matching profile is not on the camera, of if a matching profile exists but the Connect Mode is set to Manual, the camera screen lists the available networks. Select the network you want to connect to.
For each network on the list:
Connection type is designated with either
 (Infrastructure) or
  (Ad Hoc).
 The presence of a padlock,
 , indicates the network is secure, and requires a security key to access. Enter the security key if prompted. (Ask the network administrator for this information if it is unavailable.)
 Relative signal strength is indicated by the number of escalating bars,
When a connection is made, the wireless network status light glows steady green. . Green bars indicate a connection to the network.
-
-
If a wireless network is not available or you are unable to connect:
-
You may be out of the signal range. Move within range.
-
The network may not be broadcasting its SSID or network name, so it does not appear as an available network on your camera. Set up a profile on your camera to match the network settings (see Setting up a network profile) and try again.
-
Network settings may not match the settings in any of the profiles in your camera. Set up a profile on your camera to match the network settings (see Setting up a network profile) and try again.
For other reasons that might prevent a connection, see Wireless network connection.
-
-
For more information, visit www.kodak.com/go/wifisupport or www.wi-fi.org.
Setting up a network profile
Depending on the settings for a given Wi-Fi wireless network, you may need to create a network profile on the camera to be able to detect, then connect to it. For example, if the network is not broadcasting its SSID, or network name, the network does not appear as an available network on the camera. However, if you know the SSID and other information about the network, you can manually create a profile on the camera that will allow your camera to detect and connect to the network.
| NOTE: | When you connect to a secure network, designated by a padlock,  , or if you connect to a network more than once, a profile containing the network settings is automatically created and stored on your camera. , or if you connect to a network more than once, a profile containing the network settings is automatically created and stored on your camera. |
-
In View
 , press the Menu button, then select Setup.
 -
Select Wireless
 , then select Profiled Networks.
 -
Select Add Network Profile.
-
Select and change settings to match the network to which you want to connect, including the SSID, Security, and other settings, as appropriate.
NOTE: In an Infrastructure network, you can usually view the network settings with the software program included with the router. See the router documentation for details.
You can also choose a connect mode to determine the behavior of the camera each time the Wi-Fi card (may be sold separately) is deployed:
Auto (default)—The camera scans for available networks. If the SSID and settings of an available network match the SSID and settings of a network profile on the camera, the camera automatically connects.
Prompt—The camera scans for available networks. If the SSID and settings of an available network match the SSID and settings of a network profile on the camera, you are prompted to allow or deny the connection.
Manual—The camera screen lists the available networks. After you select the network you want to connect to, the camera uses the SSID and settings of the matching profile on the camera to connect to the network.
-
When finished, touch Done.
For more information, visit www.kodak.com/go/wifisupport or www.wi-fi.org.
Choosing or changing a network connection
If you are connected to a Wi-Fi wireless network and you want to switch the connection to a different Wi-Fi wireless network, select another available network on your camera:
-
In View
 , press the Menu button, then select Setup.
 -
Select Wireless
 .
. -
To see a list of networks that are broadcasting in your vicinity, select Available Networks.
To see a list of networks stored on your camera, select Profiled Networks.
-
Select a network from the list.
-
If prompted, enter a security key code for the network. (Ask the network administrator for this information if it is unavailable.)
-
For more information, visit www.kodak.com/go/wifisupport or www.wi-fi.org.
Connecting to public hotspots
A hotspot is a location that provides free or fee-based public wireless broadband Internet service to mobile visitors. Hotspots can be found in places such as airports, libraries, coffee shops, and hotels.
| NOTE: | The requirements for connecting to public hotspots vary. If you have trouble connecting to a particular hotspot, ask the network administrator or operator of the hotspot about specific requirements or settings that may be required to connect. Connection to some hotspots may not be supported by the camera. |
Connecting to a fee-based hotspot
Fee-based hotspots usually require an account with specific network settings and a username and password to gain access.
Contact the fee-based service provider or visit the provider Web site to enroll in a hotspot account plan. For information on Kodak partner service providers, visit www.kodak.com/go/wifisupport.
| NOTE: | Your camera contains one or more pre-configured network profiles for Kodak partner hotspot service providers. Sites that use unique or non-standard methods for authentication may not be supported. |
To connect to a fee-based hotspot:
-
At the hotspot location, slide the Capture/View switch to View
The wireless network status light (next to the Wi-Fi card slot) blinks amber as the camera scans for available networks. , then deploy the Wi-Fi card (see Inserting and deploying a Kodak Wi-Fi® card). (Wi-Fi card may be sold separately.) If the card is already deployed, touch the Wireless icon,
  , located on the bottom toolbar.
The first time you try to connect, enter your account information for the hotspot provider:
-
-
Select the provider name from the list. If the hotspot provider name is not shown, select Other.
-
Enter your username for the provider hotspot account.
If prompted, enter the domain name for your hotspot provider.
NOTE: If you chose Other from the list of hotspot providers, you may be required to enter your username in the form of providername/username@domainname. Check with the service provider for details.
-
Enter your password for the provider hotspot account.
-
When a connection is made, the wireless network status light glows steady green.
-
Connecting to a free hotspot
Access to free hotspots is usually gained in one of three ways:
-
Connection without authentication—The network SSID is broadcast; the camera scans, discovers, then connects to the network and your KODAK EASYSHARE Gallery account.
-
Connection with authentication (limited support)—Access to the network is granted after entering account information for the provider.
NOTE: Sites that use unique or non-standard methods for authentication may not be supported.
-
Connection with license agreement or welcome page (not supported)—Access to the network is granted after accepting a license agreement or acknowledgement. Since the camera interface does not support general Web browsing, it is not capable of displaying site license agreements or welcome pages.
To connect to a free hotspot:
-
At the hotspot location, slide the Capture/View switch to View
The wireless network status light (next to the Wi-Fi card slot) blinks amber as the camera scans for available networks. , then deploy the Wi-Fi card (see Inserting and deploying a Kodak Wi-Fi® card). (Wi-Fi card may be sold separately.) If the card is already deployed, touch the Wireless icon,
  , located on the bottom toolbar.
The first time you try to connect, select the provider name from the list. If the hotspot provider name is not shown, select Other.
When a connection is made, the wireless network status light glows steady green.
Key to the wireless status icon and network status light
See Inserting and deploying a Kodak Wi-Fi® card for Wi-Fi card positions (Wi-Fi card may be sold separately).
| Color / behavior | Indicates... | |
|---|---|---|
| Wireless icon | Network status light | |
|
None |
Off |
Camera power is off or Wi-Fi card is not inserted; no network connection |
|
|
Off |
Wi-Fi card is retracted (fully inserted); no network connection |
|
|
Amber |
Wi-Fi card is deployed; no network connection |
|
|
Amber / blinking |
Wi-Fi card is deployed; scanning for available networks |
|
|
Green |
Wi-Fi card is deployed; connected to network |
|
|
Green |
Wi-Fi card is deployed; connected to network with limited connectivity (dynamic IP address was not received) |
|
|
Red / blinking |
Wi-Fi card error; remove and reinsert Wi-Fi card |
 Gray
Gray  Yellow
  Yellow / blinking
  Yellow with signal
  Yellow with gray signal
  Red / blinking
 Previous Next