KODAK OFFICE HERO 6.1 All-in-One Printer — Extended User Guide
Table of Contents > Faxing > Before you begin faxing
9 Faxing
Before you begin faxing
Before you can send or receive faxes, you must connect your printer and set up the fax options.
Connecting the printer for faxing
Selecting the country/region
For the fax to work properly, the country or region selected on the printer must match your location. This setting determines how your faxes are sent and received.
To set the correct country or region:
-
Press Home.
-
Press
 to select Printer Settings, then press OK.
 -
Press
 to select Country/Region, then press OK.
 -
Press
 to select your country or region, then press OK.
Determining your telephone system type
The instructions for setting up your printer for faxing differ depending on the type of telephone service you have. Determine the type of telephone service you have, and connect your printer accordingly.
| IMPORTANT: | Use the phone cord that was provided with the printer. If you use any other phone cord, you may not be able to send or receive faxes successfully. |
-
Standard telephone service — telephone service that uses dedicated telephone wiring to transmit only phone signals
-
Cable telephone service — telephone service that is delivered by a cable television service
-
Digital Subscriber Line (DSL) — telephone service that uses the wires of a local telephone network to transmit digital data over cables
-
Internet telephone service (Voice-Over-Internet-Protocol or VOIP) — telephone service delivered by an Internet provider
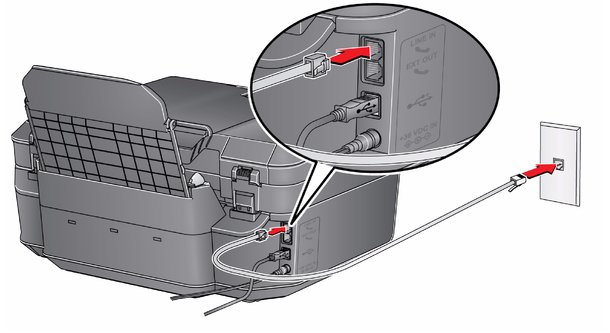
Connecting to a Standard or Cable telephone service
If you have Standard or Cable telephone service, connect one end of the phone cord that came with the printer into the LINE IN port on the back of the printer and the other end into the wall phone jack.
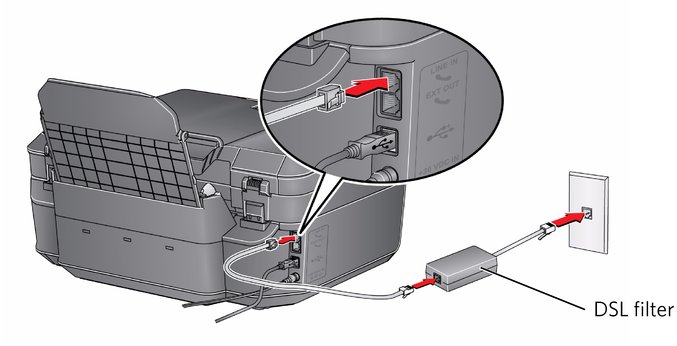
Connecting to a Digital Subscriber Line (DSL)
If you have DSL telephone service, connect one end of the phone cord that came with the printer into the LINE IN port on the back of the printer and the other end into the DSL filter (available from your DSL provider), which is connected to the wall phone jack.
| NOTE: | You must use a DSL filter to transmit fax signals properly to your printer. |
Connecting to Internet telephone service (Voice-Over-Internet Protocol or VOIP)
If you have Internet telephone service, you should already have a cable modem/router connected to the cable outlet with a coaxial cable. You will also need an Analog Telephone Adapter (ATA) to connect your printer for faxing.
| NOTE: | Sometimes the cable modem/router has a built-in ATA. Contact your cable telephone service provider for more information. |
-
Connect an RJ-45 (also called CAT 5) cable from the cable modem/router to the WAN port on the Analog Telephone Adapter (ATA).
-
Connect one end of the phone cord that came with the printer (RJ-11 telephone cord) to one of the phone input ports on the ATA and the other end to the LINE IN port on the back of your printer.

Determining whether your phone line is dedicated or shared
To connect your printer for faxing correctly, you need to determine whether your phone line is shared or dedicated.
-
A dedicated phone line is one that has only this printer and no other devices connected to it. If you have a dedicated line, connect your printer as described for your type of phone service (see Connecting to a Standard or Cable telephone service , Connecting to a Digital Subscriber Line (DSL) , or Connecting to Internet telephone service (Voice-Over-Internet Protocol or VOIP)).
-
A shared phone line is one that has several devices connected to it, such as a phone and/or answering machine as well as the printer. If you have a shared line, connect your printer in one of the following ways, based on the devices you have connected to the same phone line.
If you share the line with an answering machine or telephone:
-
Connect one end of the phone cord that came with the printer into the LINE IN phone port on the back of the printer.
-
Connect the other end of the phone cord into either a wall phone jack or a DSL filter, depending on the type of telephone service you use.
-
Connect one end of the phone cord for your answering machine into the EXT OUT phone port on the back of the printer.
-
Connect the other end of the phone cord into the answering machine or telephone.
NOTE: If you have an answering machine, set the number of rings to answer on the printer to a higher number than the rings to answer for the answering machine (see Rings to Answer under Selecting fax settings).

If you have an answering service :
If you have an answering service that uses a computerized system for recording messages remotely for the same phone line that you use for your all-in-one printer, then you can set up a distinctive ring to receive faxes automatically (see Distinctive Ring under Selecting fax settings).
If you do not set up a distinctive ring, you can still receive faxes manually (see Receiving a fax manually ).
-
Entering fax sender information
Fax sender information appears in the header of any fax that you send from your all-in-one printer. Typically this is your name or your business name, your fax number, and your phone number.
| NOTE: | If you do not enter fax sender information, the header on faxes that you send will be blank. |
To enter fax sender information:
-
Press Home.
-
Press
 to select Fax Settings, then press OK.
 -
With Fax Sender Information highlighted, press OK.
-
Use the numeric keypad on the control panel to enter:
-
your name or business name
-
your fax number
-
your phone number
See Using the numeric keypad on the control panel to enter text and/or numbers.
-
-
When you are finished entering information in a field, press
 to move to the next field.
 -
Press OK to save the information.
Selecting fax settings
Before sending or receiving faxes, set the fax settings.
-
Press Home.
-
Press
 to select Fax Settings, then press OK.
 -
Press
 or
or  to select a setting, then press
  or
or  to change the option.
 Fax Setting Options Description Fax Sender Information
--
This information appears on the faxes you send.
Press OK, then enter the fax sender name (your name), your fax number, and your phone number (see Using the numeric keypad on the control panel to enter text and/or numbers); press OK to save.
1 to 6 (default is 4)
The number of times that your phone will ring before the printer picks up the call.
If you use a dedicated phone line for your printer, set the Rings to Answer to any setting. If the printer shares the phone line with an answering machine, set the Rings to Answer to a higher number (5 or 6) than the rings to answer for the answering machine (typically 4 rings). This allows the answering machine to pick up phone calls. The printer will monitor the line after the answering machine picks up, and, if set to Auto Answer, will detect an incoming fax and receive it.
Fax Print
1-sided
The information you want to fax is on one side of the page.
2-sided*
* You must load 2-sided originals in the ADF (see Using the Automatic Document Feeder (ADF))
The information you want to fax is on both sides of the page.
Fax Speed
Fast - 33.6K (default) Medium - 14.4K Slow - 9.6K
Use this setting to reduce the fax transmission speed of your printer. If you are having difficulty sending or receiving a fax or if your fax works intermittently, then reducing the fax speed to Medium or Slow may resolve the issue. If you are using Vonage or Magic Jack, we recommend that you set the fax speed to Slow.
Redial if No Answer
Yes (default) / No
If the fax number you call does not answer, the printer will redial the number automatically one time.
Busy Redial Attempts
0 to 12
(default is 5)
The number of times that the fax will attempt to redial a busy number.
No (default) / Yes
If you have call-waiting service on your phone line, you can disable it so that an incoming call does not interrupt your fax transmission.
Select Yes to disable call waiting, then enter the call waiting disable code (below).
NOTE: You must enable call waiting manually after your fax transmission.
Call-Waiting Disable Code
*70 (default)
The printer automatically dials the call waiting disable code before dialing the number to which you are sending a fax. This code disables call waiting for the duration of the fax, preventing incoming calls from interrupting your fax transmission.
The usual code to disable call waiting is the default *70. If the call waiting disable code is different in your area, press OK, then press
 to erase the current code. Use the keypad to enter the correct code, then press OK.
 Any ring (default) / Single Ring / Double Ring / Triple Ring
This service, available from most phone companies, adds multiple phone numbers to one phone line. Each phone number then has a distinctive ring pattern (single, double, or triple ring) to let you know which number is ringing.
Select the ring pattern assigned to the phone number for the printer so the printer can receive faxes automatically.
Fax Speaker
On (default) / Off
The fax speaker allows you to hear the dial tone and initial fax tones when sending faxes.
After Failure Only (default) / Never / Always
The Fax Confirmation Page contains the time and date, the number you called, the number you called from, and whether the transmission was successful.
--
To print the current fax settings, press OK. Load letter or A4 paper, then press Start Black or Start Color.
--
The Fax Cover Page shows the date and headings for To and From information for your fax. Use this cover page, if needed, when sending your fax.
To print a Fax Cover Page, press OK. Load letter or A4 paper, then press Start Black or Start Color. (The Fax Cover Page is black-and-white.)
--
The Fax Activity Log contains information (date, time, duration, to/from, number of pages, and more) about the last 30 faxes sent and/or received.
To print a Fax Activity Log, press OK. Load letter or A4 paper, then press Start Black or Start Color.
Tone (default) / Pulse
Determines how the printer dials a fax number.
Tone dialing (the more common method) uses tones to dial a phone number. It is faster and more reliable than pulse dialing, which uses a series of pulses to dial a phone number.
Traditionally, pulse dialing was used by rotary phones; tone dialing is used by touch-tone phones.
On (default) / Off
Error correction is applied only when sending black-and-white faxes. It reduces the loss of data, which can occur on poor phone lines.
Error correction increases the send time on poor phone lines, but the transmission is more reliable. (Error correction does not apply to faxes being received. )
If you are using Vonage or Magic Jack, we recommend that you set Error Correction to OFF.
To adjust fax settings from the Online Printer Management Tool:
-
Open the Online Printer Management Tool in a browser (see Accessing the Online Printer Management Tool).
-
Select the Settings tab, then select Fax > Settings.
-
Change the Sender Information and/or fax Settings as needed.
-
Click Save to update the settings.
Setting the answer mode (auto answer or manual)
The default setting for Auto-Answer is on. When Auto Answer is on, the printer picks up all incoming faxes automatically. The green Auto Answer LED is lit when Auto Answer is on.
To answer calls manually, turn off Auto Answer by pressing the Auto Answer button so that the green LED is off. (See Receiving a fax manually .)
Working with the phonebook
You can enter up to 60 fax numbers in the phonebook.
You can create and manage the phonebook from the printer LCD or, if your printer is connected to a computer with WINDOWS OS, you can use Home Center Software.
You can also use the Online Printer Management Tool to edit the Fax Phone Book. See Editing the fax phone book.
Using symbols in phonebook entries
The following symbols are used in phonebook entries:
| Symbol | Description | Response by fax |
|---|---|---|
|
0 - 9 |
numbers |
Dials the number |
|
* |
star |
Used for special features (for example, *70 is used to deactivate call waiting) |
|
, |
comma |
Causes a 2-second delay before dialing the remaining numbers |
|
# |
pound |
Used for special features (for example, # at the end of a number signifies the completion of the number sequence) |
Adding a new phonebook entry
To add a new phonebook entry:
-
Press Phonebook.
-
Make sure Edit Phonebook is selected, then press OK.
-
Make sure Add New Entry is selected, then press OK.
-
Make sure Number is selected, then press OK.
-
Use the numeric keypad on the control panel to enter a fax number, then press OK.
-
With Name selected, press OK.
-
Use the LCD keyboard to enter a name:
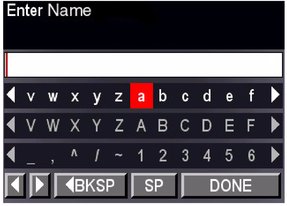
-
On the control panel, press
 ,
,  ,
,  or
or  to select the letters.
 -
When you are finished, select DONE, then press OK.
-
-
Optional: Assign a Quick Dial number.
Set up your ten most frequently used fax numbers as Quick Dial numbers. You will be able to dial them quickly, and they will be displayed at the top of your phonebook.
-
Press
 to select Quick Dial, then press OK.
 -
Using the numeric keypad on the control panel, enter a number from 0 to 9, then press OK.
-
-
Press
 to select DONE, then press OK.
Editing a phonebook entry
To edit a phonebook entry:
-
Press Phonebook.
-
Make sure Edit Phonebook is selected, then press OK.
-
Press
 to select Edit Entry, then press OK.
 -
Press
 to select the entry you want to edit, then press OK.
 -
Press
 to select the field you want to edit, then press OK.
 -
Use the LCD keyboard and/or numeric keypad to make your change(s).
-
Press
 to select DONE, then press OK.
Deleting a phonebook entry
To delete a phonebook entry:
-
Press Phonebook.
-
Make sure Edit Phonebook is selected, then press OK.
-
Press
 to select Delete Entry, then press OK.
 -
Press
 to select the entry you want to delete, then press OK.
 NOTE: If you do not want to delete the entry, press Cancel.
-
To delete the entry, press OK.
The entry is deleted from the phonebook.
-
Repeat steps 4 – 5 to delete more entries; when you are finished, press Back or Cancel.
Using the numeric keypad on the control panel to enter text and/or numbers
The number keys on the numeric keypad represent a number and several characters. For example, the number 2 key also represents the letters A, B, C and a, b, and c. You must press the 2 key multiple times to enter a corresponding letter. For example, to enter the letter "B" as the first letter of a name, press the 2 key two times; to enter the lowercase "b" at the beginning of a name, press the 2 key five times. If the lowercase "b" is not at the beginning of a name or word, press the 2 key two times.
If you need to use the same key for more than one letter in a row (for example, to type "Cab"), you need to pause between letters. To type "Cab", press the 2 key three times to enter "C", then pause 3 to 4 seconds; press the 2 key once to enter "a", then pause 3 to 4 seconds; and press the 2 key two times to enter "b". You do not need to pause if the next letter is on a different key.
Note that the Symbols (*) key and the Space (#) key also cycle through several different symbols when you press the key multiple times.
To make a correction to your entry, select  BKSP on the LCD, then press OK. This erases the rightmost character.
Using the Online Printer Management Tool to edit the Fax Phone Book
You may use the Online Printer Management Tool to edit your fax phonebook. See Editing the fax phone book.
Previous Next