Kodak EasyShare-One zoom digital camera — User's guide
Table of Contents > Sharing pictures and videos > Do it from your camera—just press Share!
8 Sharing pictures and videos
Do it from your camera—just press Share!
|
|
|
|
|

|
Press the Share button to print and email pictures, to upload pictures online to KODAK EASYSHARE Gallery, and to transfer pictures and videos to your computer. |
||
-
Press the Share button:
-
In Capture
 , to share the most recent picture or video taken.
 -
In View
 , to share the pictures and videos you select.
-
-
Select a Share option:

Email - send pictures to friends and family over the Internet (see Sending email over a Wi-Fi wireless network).
Prints - print pictures right away over a Wi-Fi wireless network, or tag them for printing at a later time (see Printing pictures over a Wi-Fi wireless network).
Upload - add pictures to your KODAK EASYSHARE Gallery albums (see Accessing KODAK EASYSHARE Gallery from your camera).
Transfer - transfer pictures to your computer (see Transferring pictures and videos to a computer).
Slide Show - watch a slide show of your albums (see Viewing a slide show).
Setup - change camera settings.
Sending email over a Wi-Fi wireless network
Use the email feature to invite your family and friends to view your albums on KODAK EASYSHARE Gallery.
| NOTE: | Your camera uses an Internet connection and KODAK EASYSHARE Gallery to email pictures remotely. KODAK EASYSHARE Gallery may not be available in your area; however, you can use the EasyShare-One camera with your regional online Kodak picture service. |
-
In View
 , select a picture. (In Capture, the most recent picture taken is automatically selected). To select multiple pictures, use the drawer (see Using the drawer to select multiple pictures and videos) or select an album.
 -
Press the Share button, then select Email. Touch Start to begin.
-
Touch a name from the list, or touch Add Person to create a new entry.
-
Use the touch keyboard to enter a subject and a message.
-
When finished, touch Done.
If connected to an available Wi-Fi wireless network with an Internet connection, the email is sent to the selected person. Otherwise, the email is placed in the outbox (see The outbox).
| NOTE: | An email message inviting the recipients to view your pictures is sent from your KODAK EASYSHARE Gallery account. If this is the first time emailing the selected pictures, a new album is created in your KODAK EASYSHARE Gallery account. |
-
With an available Wi-Fi wireless network with an Internet connection, you can even email albums stored in your KODAK EASYSHARE Gallery collection. See Emailing from the Gallery.
See Using your camera with a Wi-Fi wireless network, or visit www.kodak.com/go/wifisupport for more information.
Creating and managing an address book
-
Press the Menu button, then select Setup.
-
Select Contacts
 .
. -
Touch a name from the list, or touch Add Person to enter a new name. Use the touch keyboard to enter contact information, including email address.
| NOTE: | You can also create and manage an address book using EasyShare software on your computer, then synchronize to update your camera (see Synchronizing and transferring to a computer). Click the Help button in the Kodak EasyShare software for details. |
Creating and managing group lists
-
Press the Menu button, then select Setup.
-
Select Groups
 .
. -
Touch a group from the list, or touch Add Group to enter a new group.
-
Use the touch keyboard to enter a group name, then select contacts from your address book to add to the group.
| NOTE: | You can also create and manage an address book using EasyShare software on your computer, then synchronize to update your camera (see Synchronizing and transferring to a computer). Click the Help button in the Kodak EasyShare software for details. |
Printing pictures over a Wi-Fi wireless network
-
In View
 , select a picture. (In Capture, the most recent picture taken is automatically selected). To select multiple pictures, use the drawer (see Using the drawer to select multiple pictures and videos) or select an album (videos are excluded).
 -
Press the Share button, then select Prints.
-
Press
 to select the number of copies to print.
 -
When finished, press the OK button or touch Done.
If connected to an available Wi-Fi wireless network with one or more connected printers, the print is sent to the printer you select. Otherwise, the picture is placed in the outbox (see The outbox).
| NOTE: | For the best 4 x 6 in. (10 x 15 cm) prints, set the camera to the (3:2) Picture Size setting (see Changing capture settings). |
See Using your camera with a Wi-Fi wireless network, or visit www.kodak.com/go/wifisupport for more information.
Accessing KODAK EASYSHARE Gallery from your camera
With a Kodak Wi-Fi card (may be sold separately) and available Wi-Fi wireless network with an Internet connection, you can logon to your EASYSHARE Gallery account, then upload, view, and email pictures right from your camera.
Visit www.kodakgallery.com to create a free account. Then, enter your account information on your camera (see Setting KODAK EASYSHARE Gallery account information).
| NOTE: | KODAK EASYSHARE Gallery may not be available in your area; however, you can use the EasyShare-One camera with your regional online Kodak picture service. |
Setting the Gallery domain name
In addition being connected to a Wi-Fi wireless network with Internet connection (see Using your camera with a Wi-Fi wireless network), to use the EASYSHARE Gallery features of your camera, you must choose the proper domain name, or URL, for the region you live in. You are prompted to choose one the first time you connect to EASYSHARE Gallery.
To change it:
-
Press the Menu button, then select Setup.
-
Select Preferences
 .
. -
Touch The Gallery URL.
-
Select the URL for the region you live in.
Uploading pictures to the Gallery
-
Make sure the account settings on your camera match your EASYSHARE Gallery account settings (see Setting KODAK EASYSHARE Gallery account information).
-
Connect to a Wi-Fi wireless network with Internet connection (see Using your camera with a Wi-Fi wireless network). If this is the first time connecting to EASYSHARE Gallery, select your regional online picture service domain when prompted. To change your regional domain after setting it, see Setting the Gallery domain name.
-
In View
 , select a picture. To select multiple pictures, use the drawer (see Using the drawer to select multiple pictures and videos) or select an album.
 -
Press the Share button, then select Upload.
The camera checks for an Internet connection and regional EASYSHARE Gallery service.
-
If services are available, the camera connects to EASYSHARE Gallery. Follow the instructions on the screen.
A message appears on the screen indicating the upload status.
-
If a service is not available, try again when and where services are available.
-
Viewing pictures on the Gallery
-
Make sure the account settings on your camera match your EASYSHARE Gallery account settings (see Setting KODAK EASYSHARE Gallery account information).
-
Connect to a Wi-Fi wireless network with Internet connection (see Using your camera with a Wi-Fi wireless network). If this is the first time connecting to EASYSHARE Gallery, select your regional online picture service domain when prompted. To change your regional domain after setting it, see Setting the Gallery domain name.
-
In View
 , press the Menu button.
 -
Select The Gallery to view your albums, or select Friends' Albums to view the albums of others that have been saved to your account.
The camera checks for an Internet connection and regional EASYSHARE Gallery service.
-
If services are available, the camera connects to EASYSHARE Gallery, and lets you view your albums and pictures.
-
If a service is not available, try again when and where services are available.
-
Viewing a slide show of your pictures on the Gallery
-
While viewing pictures in your EASYSHARE Gallery collection, touch the Slide show icon,
Pictures from the current album are displayed every 3 seconds. The slide show repeats after it cycles through all images in the album. .
.
-
To move forward or backward through the slide show order, press
 .
. -
To pause the slide show, press
 . To resume, press
 .
. -
To end the slide show any time, touch the screen or press the OK button.
-
To view the slide show on your TV, connect the camera to the TV, then run the slide show (see Displaying pictures and videos on a television).
-
Emailing from the Gallery
-
While viewing albums in your EASYSHARE Gallery collection (see Viewing pictures on the Gallery), select an album, then press the Share button.
-
Select Email.
-
Touch a name from the list, or touch Add Person to enter a new name.
-
Use the touch keyboard to enter a subject and a message.
-
When finished, touch Done.
The email is sent to the selected person.
Transferring pictures and videos to a computer
You can transfer pictures and videos from your camera to any computer that has EasyShare software installed. Use the USB cable to transfer automatically, or select pictures on your camera then select Transfer from the Share menu to transfer over your Wi-Fi wireless network.
See Synchronizing and transferring to a computer.
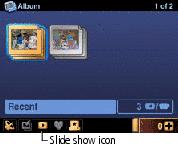
Viewing a slide show
|
|
|
|
|
||
|
2.
Press the Share button, then select Slide Show. Or, touch the Slide show icon,
 . . Pictures and videos from the album are displayed every 3 seconds. The slide show repeats after it cycles through all images in the album.
|
||||
 , press the Menu button then select a View option (see
  .
.  . To resume, press
 .
. 
 to control the camera functions when connected to a TV.
Previous Next