Kodak EasyShare digital picture frame — User's guide
Table of Contents > Doing more with your frame > Printing pictures
3 Doing more with your frame
Printing pictures
Your frame is compatible with PictBridge technology, so you can print directly to PictBridge enabled printers.
| NOTE: | Printing from the Gallery (Viewing pictures from the KODAK Gallery) is not currently supported. |
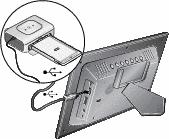
Connecting the frame to a PictBridge enabled printer
|
|
|
|
|
|
1.
Turn off the frame and printer.
|
||
|
2.
Connect the USB cable (included with your frame) from the frame to the printer.
|
|||
Printing to a PictBridge enabled printer
|
|
|
|
|

|
1.
Turn on the printer. Turn on the frame.
The USB connection mode screen appears on the frame. Or, access the screen manually, see Manually changing connection mode. |
||
|
2.
Change your connection mode from computer to printer. Select Connect to printer, then press OK.
|
|||
|
3.
If you are in a slide show or single view, press
 . If you are in thumbnails view, press . If you are in thumbnails view, press  to find a picture, then press to find a picture, then press  . . |
|||
|
4.
Highlight Print, press OK, then highlight Print again, and press OK
The picture is printed. To print multiple pictures, see Selecting multiple pictures/videos. |
|||
Manually changing connection mode
The connection mode must match what you connect the frame to: computer or printer. The default is Connect to computer. You can change the connection mode manually.
-
Disconnect the printer or computer from the frame.
-
On the remote control, press
 .
. -
Select Settings
 ® Device configuration ® USB connection mode.
 -
Select the mode you need, printer or computer. See
 .
. -
Reconnect the printer or computer. If you are printing, continue with step 3 of the printing directions in Printing to a PictBridge enabled printer.
Previous Next