Kodak EasyShare wireless digital picture frame — User's guide
Table of Contents > Doing more with your frame > Printing pictures
3 Doing more with your frame
Printing pictures
Your frame is compatible with PictBridge technology, so you can print directly to PictBridge enabled printers.
| NOTE: | Printing from the Gallery (Viewing pictures from the KODAK Gallery) is not currently supported. |
Preparing the frame and printer for printing
|
|
|
|
|
|
1.
Make sure your frame is disconnected from the printer.
|
||
|
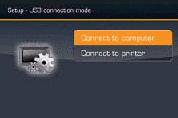
2.
On the frame, change your connection mode from computer to printer. See Manually changing USB connection mode.
|
|||
|
3.
Turn off the frame and printer.
|
|||
|
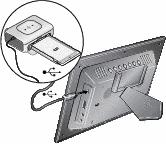
4.
Connect the USB cable (included with your frame) from the frame to the printer.
|
|||
Printing to a PictBridge enabled printer
|
|
|
|
|
|
1.
Turn on the printer. Turn on the frame.
|
||
|
2.
If you are in a slide show or single view, press
 . If you are in thumbnails view, press . If you are in thumbnails view, press  to find a picture, then press to find a picture, then press  . . |
|||
|
3.
Highlight Print, press OK, then highlight Print again, and press OK
The picture is printed. To print multiple pictures, see Selecting multiple pictures/videos. |
|||
|
4.
Change your connection mode back to Connect to computer. See Manually changing USB connection mode.
|
|||
Manually changing USB connection mode
The connection mode must match the device you connect the frame to (computer or printer) before you make the connection. The default is Connect to computer.
-
Disconnect the printer or computer from the frame.
-
On the remote control, press
 .
. -
Select Settings
 ® Device configuration ® USB connection mode.
 -
Select the mode you need, printer or computer. See
 .
. -
Reconnect the printer or computer. If you are printing, continue with step 3 of the printing directions in Printing to a PictBridge enabled printer.
Previous Next