Kodak ESP 9 All-in-One Printer — User Guide
Table of Contents > Viewing and Printing Photos > Printing photos
5 Viewing and Printing Photos
Printing photos
Printing photos from a PictBridge camera
You can print photos directly from a PictBridge camera, which controls photo selection and printing.
-
Load the desired paper tray with photo paper, print side down.
-
Connect a PictBridge camera to the USB port located on the front panel of your printer.
-
Use your PictBridge camera to select and print the photos.
Printing photos from non–PictBridge digital cameras, memory cards, and USB flash drives

|
CAUTION: This printer does not support portable USB "flash" drives that: |
-
Were formatted using any of the following file storage systems:
If a flash drive is plugged into the USB port on the front panel that the printer cannot read, the printer does not display photos, makes an audible sound ("beep"), and displays an error message on the LCD screen.
See the first Tip below for a work–around if your flash drive cannot be read by your printer.
|
|
Tip: If you would like your printer to print photos stored on a non–FAT formatted device, or stored as non–.jpeg files, you must first send the files to your computer to be read.
Use your computer to explore the files stored on the flash drive while it is still plugged in. Navigate to and open the file in the computer, or transfer the file(s) to the computer hard drive. Then, print the file from your computer. |

-
Connect a digital camera or portable USB drive to the front panel USB port, or insert a memory card to the appropriate card reader on the front panel.
The printer displays the photos on the LCD screen, last photo first.
-
Load the paper tray with photo paper, print side down.
-
On the control panel, press
 or
or  until a photo you want to print is displayed on the LCD screen.
 -
Press OK to select the photo. A check mark displays on the LCD screen to indicate your action. If you change your mind and want to de-select the photo from printing, press OK again; the check mark is removed.
-
If you are satisfied with the image shown, you can modify the quantity of copies to be printed by pressing
 until the number you want is shown on the LCD screen. To decrease any quantity greater than 1, press
  until the number you want displays.
 -
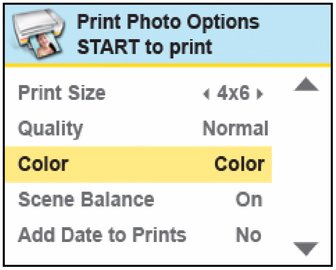
If you want to specify different print parameters for the photo, press Menu to display the Print Photos Options menu. A sample of the menu is shown in the illustration below.
-
Here you can press
 until the parameter you want to adjust is selected. If a value is displayed between the
  and
and  symbols in the row, press
  or
or  to select the value you want.
 -
Press Start to print the selected photo, or press
 until View Photos is selected.
 -
Press
 or
or  until you view another photo you want to print.
 -
Repeat this process as needed.
NOTE: Each photo is automatically deselected after it has been printed

Printing tagged images
The Digital Print Order Format (DPOF) is an industry-standard file that can be created by some digital cameras. Camera selected photos are photos you tag for printing with your digital camera. When you select photos with your camera, the camera creates a DPOF file that identifies which photos have been tagged for printing. Your Kodak All-in-One printer can read the DPOF file from the memory card so you do not have to re-select the photos to print.
| NOTE: | Not all digital cameras support tagging or the creation of tagged image files. Refer to your camera's user guide to ensure it supports this function. |
When you print tagged photos, the selected layout is applied unless your camera allows selection of sizes. If not specified by the DPOF information, the current default print photo size and other settings will be used.
Printing from a Bluetooth–enabled device
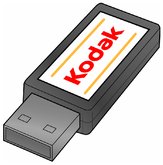
Bluetooth wireless technology allows wireless connectivity between compatible electronic devices. Your printer allows you to print .jpg images from a Bluetooth–enabled device, using an optional Kodak USB Bluetooth 2.0 USB adapter. You can purchase the Kodak Bluetooth adapter from Kodak at www.kodak.com/go/accessories.
The Kodak Bluetooth adapter (shown below) supports connectivity between your All–in–One printer and the following Bluetooth–enabled devices:
|
|
|
|
|
|
|
||
|
|||
|
|||
|
|||
The Bluetooth adapter will not work when plugged directly into computers, Kodak printer-docks, other types of Kodak printers or devices made by other manufacturers. This adapter works exclusively with Kodak All-in-One printers.
To enable Bluetooth wireless connectivity, plug the Kodak Bluetooth adapter into the USB port located on the front panel of your printer.
| NOTE: | Before you can transmit photos to your printer from a Bluetooth–enabled device, you must first "pair" the printer and the device so that they can communicate. This "pairing" is performed from your device's interface. Review the instructions for pairing that came with you Bluetooth–enabled device, as needed.
When the device is searching for other Bluetooth enabled devices to pair with and if your printer is within range of the device (see Range below), your printer will appear in the list, with a name starting with ESP. (Your device may allow you to rename it, as appropriate.) If your device prompts you for the printer's personal identification number (PIN) to authenticate and initiate the connection, enter 1111. |
Bluetooth devices do not use a Print command. You must use the device's Send function to transmit an image stored on it to the All–in–One printer. Only one file can be sent from the device at a time. Once received, your printer will print the image automatically using the default settings.
Range
When the device and the printer are connected, you can send photos from your Bluetooth device to the printer. Your printer supports connectivity to one Bluetooth device at a time.
For the highest transfer speed, Kodak recommends keeping a maximum distance of 10 meters (32.8 feet) between Bluetooth devices, as they may not work reliably beyond this range.
Printing multiple photos
When you select a print size that is smaller than the paper size, this printer automatically lays out multiple photos using the least amount of space, minimizing paper waste when separating the photos.
Printing panoramic photos
You can print a panoramic photo on 4 x 12 paper, or two panoramic photos on U.S. letter or A4 paper; some cropping will occur.
Previous Next