KODAK PULSE Digital Frame — Extended user guide
Table of Contents > Getting started > Connecting to your wireless network
1 Getting started
Connecting to your wireless network
When you connect your digital frame to the Internet over your wireless network, you can perform a host of activities including adding pictures from your computer, receiving pictures from friends, changing display settings, and more.
Before you start
Before you start connecting your digital frame to your wireless network, make sure you:
-
Have Internet access and a wireless network set up in your home
-
Know your network name (also called an SSID)
-
Know your wireless network's security code (password), if you have security enabled on your wireless network
| NOTE: | If you are not sure you have a wireless network or don't know your security password, ask the person who set up your computer. |
Connecting with the network setup wizard
| NOTE: | If someone else set up your digital frame for you (for instance, if it was a gift), your screen may show fewer steps. |
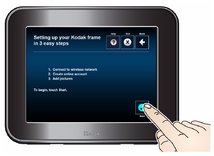
After you select your language, the network setup wizard appears.
|
|
|
|
|
||
|
1.
Touch Start
 .
. Available wireless networks are listed. If your wireless network is not shown, see Network is not shown after network scan.
|
||||
|
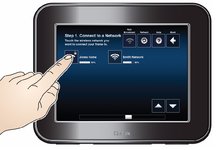
2.
Touch your network.
The digital frame scans for your wireless network. A message appears when it has successfully connected. |
||||
 to return to the language screen. To bypass the wireless setup and go directly to viewing pictures, touch Exit
 . You can set up your wireless connection later,
 -
If your digital frame is successfully connected, continue with Activating your frame—www.kodakpulse.com to finish your setup.
-
If your digital frame was already set up (for instance, if it was a gift), touch OK on the confirmation screen to verify your information. Congratulations, your setup is complete!
If the information shown is incorrect, see Receiving the PULSE Digital Frame.
-
If your network is not yet connected, or you'd like to connect later, continue with the condition that applies to your network:
Network is not shown after network scan
Connect to your wireless network later
Previous Next