Kodak EasyShare printer dock plus series 3 — User's Guide
Table of Contents > Using the wireless features of your printer dock > Printing and transferring over a Wi-Fi wireless network
5 Using the wireless features of your printer dock
Printing and transferring over a Wi-Fi wireless network
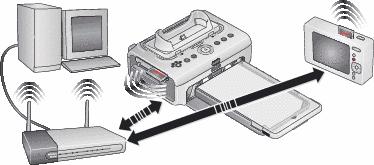
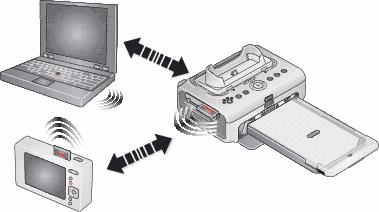
Insert a Kodak Wi-Fi card (sold separately) into the card slot. Then, print and transfer pictures using your printer dock on an existing Wi-Fi wireless (Infrastructure) network, or print pictures directly to your printer dock over a Wi-Fi wireless device-to-device (Ad-Hoc) network.
Example of a wireless Infrastructure network:
Example of an Ad-Hoc network:
Adding your printer dock to a Wi-Fi wireless network
|
|
|
|
|
||
|
1.
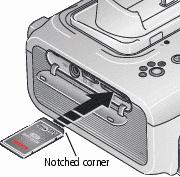
Open the accessory door on the printer dock.
|
|||||
|
2.
Orient the Kodak Wi-Fi card as shown, then push the card into the card slot to seat the connector.
The card slot light blinks as the printer dock scans for available networks. Once connected, the card slot light glows steady.
|
||||
|
3.
Make sure the printer driver from the included Kodak EasyShare software CD is installed on your computer (see Installing the software), then connect the printer dock to your computer with the USB cable (see Connecting to a computer).
|
|||||
|
4.
Configure the printer dock Wi-Fi settings (such as SSID and security) and add the printer dock as a wireless printer on your Wi-Fi wireless network:
Windows OS-based computer— Configure the printer dock Wi-Fi settings:
Add the printer dock to your computer: See Connecting to a computer. Configure the printer dock Wi-Fi settings:
|
|||||
|
5.
Close all programs on your computer, then disconnect the USB cable between the computer and the printer dock.
|
|||||
|
6.
(Optional) To print a copy of the current Wi-Fi settings for your printer dock:
|
|||||
 , and the Transfer button,
  , for 5 seconds.
 Print pictures over your Wi-Fi wireless network
-
Add the printer dock to your Wi-Fi wireless network (see Adding your printer dock to a Wi-Fi wireless network).
IMPORTANT: Add the printer dock to the same network as the computer or device you want to print from. If printing from EasyShare software, in Preferences, make sure Enable wireless connections is selected (click the Help button in the EasyShare software for details).
-
On your computer or on your Wi-Fi enabled device, select and print pictures. See your computer or device user's guide for details.
Transfer pictures over your Wi-Fi wireless network (EasyShare digital cameras only)
-
Add the printer dock to your Wi-Fi wireless network (see Adding your printer dock to a Wi-Fi wireless network).
IMPORTANT: Add the printer dock to the same network as the computer you want to transfer from. If you have two or more computers on the same network, use the Kodak wireless printer configuration utility on your computer to choose which computer to transfer to (see the wireless configuration utility Help for details).
-
Dock your EasyShare digital camera (see Docking and charging your digital camera), then press the Transfer button,
 , to transfer pictures to EasyShare software on your computer (see Transferring pictures from your digital camera).
| NOTE: | If the printer dock is connected to the computer with the USB cable, pictures are transferred using the cable connection instead of the wireless connection. |
See your computer or device user's guide, or visit www.kodak.com/go/wifisupport and www.wi-fi.org for more information.
Previous Next