Kodak EasyShare Z612 zoom digital camera — User's guide
Table of Contents > Doing more with your camera > Sharing your pictures
4 Doing more with your camera
Sharing your pictures
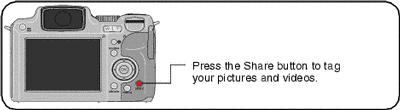
When they are transferred to your computer, you can share them by:
-
 Print (Printing tagged pictures)
 -
 Favorites (Tagging pictures as favorites)
 Email (
When can I tag my pictures and videos?
Press the Share button to tag pictures/videos:
-
Any time. (The most recent picture/video taken is then displayed.)
-
Just after you take a picture/video, during Quickview (see Reviewing a quickview of the picture or video just taken).
-
After pressing the Review button (see Reviewing pictures and videos).
Tagging pictures for printing
-
Press the Share button. Press
 to locate a picture.
 -
Press
 to highlight Print, then press the OK button.*
 -
Press
The icon appears at the top of the screen. The default quantity is one. to select the number of copies (0-99). Zero (0) removes the tag for that picture.
-
Optional (for single picture): You can apply a print quantity to other pictures. Press
 to locate a picture. Keep the print quantity as is, or
  to change it. Repeat this step until the desired print quantity is applied to the pictures.
 -
Press the OK button. Then press the Share button to exit the menu.
* To remove print tagging for all pictures in the storage location, highlight Cancel Prints, then press the OK button. Cancel Prints is not available in Quickview.
Printing tagged pictures
When you transfer the tagged pictures to your computer, the Kodak EasyShare software print screen opens. For details on printing, click the Help button in the Kodak EasyShare software.
For more information on printing from your computer, printer dock, PictBridge enabled printer, or card, see Printing pictures .
| NOTE: | For the best 4 x 6 in. (10 x 15 cm) prints, set the camera to the 5.3 MP (3:2) print Picture Size (see table, Changing picture-taking settings). |
Tagging pictures and videos for emailing
First—on your computer
Use Kodak EasyShare software to create an email address book on your computer. Then, copy up to 32 email addresses to the camera's internal memory. For details, click the Help button in the Kodak EasyShare software.
Second—tag pictures/videos on your camera
-
Press the Share button. Press
 to locate a picture/video.
 -
Press
 to highlight Email, then press the OK button.
 -
Press
 to highlight an email address, then press the OK button. Press OK again to deselect.
 If you tagged a single picture/video, you can tag other pictures/videos with the same address. Press
 to scroll through them. When the picture you want is displayed, press OK.
 To send the pictures/videos to more than one address, repeat step 3for each address.
Selected addresses are checked.
-
To remove a selection, highlight a checked address and press the OK button. To remove all email selections, highlight Clear All.
-
Press
The Email icon appears in the status area. to highlight Exit, then press the OK button.
-
Press the Share button to exit the menu.
Third—transfer and email
When you transfer the tagged pictures/videos to your computer, the Email screen opens and lets you send them to the addresses you specified. For details, click the Help button in the Kodak EasyShare software.
Tagging pictures as favorites
You can preserve your favorite pictures in the Favorites  section of your camera's internal memory, then share them with friends and family.
| NOTE: | When you transfer pictures from your camera to your computer, all pictures (including favorites) are stored on your computer at full size. Favorite pictures—smaller copies of your originals—are loaded back to your camera, so you can share and enjoy more. |
Share your favorite pictures in 4 easy steps:
|
1. Take pictures
|
|
|
2. Tag pictures as favorites
|
|
|
3. Transfer pictures to your computer
|
|
|
4. View favorites on your camera
|
|

 to locate a picture.
  to highlight Favorite, then press the OK button.

 to scroll through favorites.
 | NOTE: | The camera holds a limited number of favorites. Use Camera Favorites in the EasyShare software to customize the size of your camera Favorites section. Videos tagged as favorites remain in the Favorites folder in the EasyShare software. For more information, click the Help button in the Kodak EasyShare software. |
Optional favorite settings
In Favorites mode, press the Menu button to access optional settings.
|
|
Slide Show (Starting the slide show) |
|
Remove all favorites (Removing all favorites from your camera) |
|
|
Multi-up (Viewing multi-up (thumbnails)) |
|
Setup Menu (Customizing your camera) |


| NOTE: | Pictures taken at the 5.3 MP (3:2) picture size are displayed at a 3:2 aspect ratio with a black bar at the top and bottom of the screen. (See table for Picture Size, Changing picture-taking settings.) |
Removing all favorites from your camera
When you remove favorites from your camera, you increase the storage capacity in the internal memory. This lets you take more pictures.
-
Turn the Mode dial to Favorites
 .
. -
Press the Menu button.
-
Highlight Remove favorites, then press the OK button.
All pictures stored in the Favorites section of internal memory are removed. Favorites are restored the next time you transfer pictures to the computer.
-
Press the Menu button to exit the menu.
Preventing favorites from transferring to the camera
-
Open the Kodak EasyShare software. Click the My Collection tab.
-
Go to the Albums view.
-
Click the Camera Favorites Album for your camera.
-
Click Remove Album. (The original pictures remain unchanged.)
The next time you transfer pictures from your camera to the computer, use the Camera Favorites Wizard/Assistant to either recreate your Camera Favorites Album or to turn off the Camera Favorites feature.
Printing favorites
-
Turn the Mode dial to Favorites
 . Press
  to locate a picture.
 -
Press the Share button.
-
Highlight Print, then press the OK button.
-
Press
The icon appears in the status area. to highlight Print quantity, then press the OK button.
| NOTE: | Favorites that were taken on this camera (not imported from another source) can make prints up to 4 x 6 in. (10 x 15 cm). |
Emailing favorites
-
Turn the Mode dial to Favorites. Press
 to locate a picture.
 -
Press the Share button.
-
Highlight Email, then press the OK button.
-
Press
 to highlight one or more addresses, then press the OK button.
 -
To remove a selection, highlight a checked address and press the OK button. To remove all email selections, highlight Clear All.
-
Press
The Email icon appears in the status area. to highlight Exit, then press the OK button.
-
Press the Share button to exit the menu.
Previous Next