KODAK PALMPIX Camera for the PALM m500 Handheld Series — User's Guide
Table of Contents > Using Your PALMPIX Camera > Taking Pictures
3 Using Your PALMPIX Camera
Taking Pictures
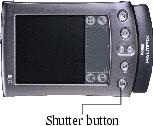
When the PALMPIX Software is running on the PALM Handheld, the Date Book button becomes the camera Preview/Shutter button.
|
|
|
|
|
|
1.
Connect the camera to the PALM Handheld, then tap the Applications button
 . . |
||
|
2.
Tap the PALMPIX Icon.

|
|||
|
3.
Press the Preview/Shutter (Date Book) button once to display a live preview of your subject on the screen.
|
|||
|
4.
Focus the camera by turning the lens.
|
|||
|
5.
Hold the PALM Handheld steady and press the Preview/Shutter button a second time to take the picture.
|
|||
-
Holding the PALM Handheld horizontally with the buttons to the right, produces a typical print format.
-
If the self-timer is activated, the PALM Handheld beeps for ten seconds, then beeps faster just before the picture is taken.
-
A progress bar appears at the bottom of the screen as the picture is transferred from the camera to the PALM Handheld. To cancel the transfer, tap the trash can icon.
-
When the picture is transferred to the PALM Handheld, it appears in the Image List with a numerical image name. See Selecting and Viewing Pictures.

|
CAUTION: Do not remove the camera during a picture transfer. Doing so may cause you to lose picture data or information. |
Previous Next