Kodak ESP 9 All-in-One Printer — User Guide
Table of Contents > Setting Up Your Printer > Setting up the fax
3 Setting Up Your Printer
Setting up the fax
Your Kodak ESP 9 All-in-One printer allows you to send and receive faxes, set up quick dials, and other fax options from the control panel.
For more information about sending and receiving faxes using this All-in-One printer, see Faxing.
| NOTE: | If your home or office setup is not described in this section, set up the All-in-One printer fax connection as you would a regular phone. See Connecting the printer to a standard telephone line. |
|
|
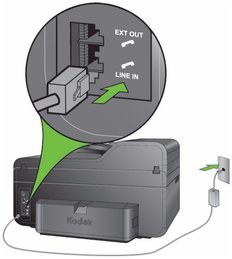
WARNING: Use only the phone cord supplied in the All-in-One printer box to connect your telephone wall jack and the port labeled Line-In on the back of the printer. Using any other phone cord may prevent you from sending and receiving faxes. |

Telephone service delivery systems and All–in–One fax features
Before setting up your ESP 9 All–in–One printer for faxing, determine which type of telephone service you use
| If your telephone service is: | Review this section first: |
|---|---|
|
Internet Phone (VOIP) telephone service |
|
|
Cable telephone delivered by a cable television service |
|
|
Standard telephone service |
|
|
Digital subscriber line (DSL) telephone service |

|
CAUTION: You should also read the following sections before connecting your ESP 9 to your telephone system. |
Multipurpose (broadband) digital telephone systems
If you use one of the following types of telephone services, you use a multipurpose, or "broadband" digital system:
-
Internet telephone (also known as Voice–Over–Internet–Protocol or VOIP)
-
Cable telephone
These systems transmit telephone signals across the same cables that transmit Internet or cable television signals.They require the use of computer or cable modems to route telephone traffic to your telephone or fax machine.
By connecting the telephone cable that came with your printer to the computer or cable modem and also to the ESP 9, your printer can successfully send and receive faxes over this type of telephone system.
Standard telephone systems
Sometimes called "Plain Old Telephone Systems" (POTS), this type of telephone service relies on a network of dedicated telephone wiring that cannot be used to transmit any other type of signal.
Your printer needs only the standard telephone cable that came with your printer, connected to both the printer and to the wall telephone jack, in order to send and receive faxes through the standard wall telephone jack.
Digital subscriber line (DSL) telephone systems
A DSL telephone system is a dedicated telephone service that, like multipurpose digital systems, transmits packets of digital data over cables. Unlike multipurpose systems, DSL networks use the wires of a local telephone network to transmit its signals.
To transmit fax signals properly to your printer, you must connect the telephone cable that came with the printer to a cable equipped with a DSL filter, and then connect the filtered cable to the printer and to the wall jack.
|
|
CAUTION: Your telephones will not work without the installation of the DSL filter. |
Using cordless telephones with the ESP 9 All–in–One fax
Cordless telephones, which connect to a digital, standard, or DSL telephone system, can be used with your All-in-One printer. To do so, you must connect the base station of your telephone (i.e., the cradle which connects your phone to the wall telephone jack or digital modem) to the telephone cable that came with your printer.
Using voice–messaging services with the ESP 9 All–in–One fax
Voice messaging (also called voice mail) services are operated by your telephone company. Voice messaging systems use a centralized, computerized system for recording messages rather than equipment at your telephone. They do not record fax transmissions.
Your printer relies on recognizing fax signals via the cable connecting it to the telephone (or wall jack), and therefore cannot retrieve faxes routed to the voice messaging service.
To automatically retrieve faxes with your printer if you subscribe to voice messaging through your telephone company, you must have one of the following options in place:
-
A dedicated phone line that does not have voice mail used exclusively for fax transmissions.
-
If the telephone line connected to your printer accepts calls for two or more phone numbers, the number used for fax calls must use a distinctive ring not used by any other number sharing this line. See Specifying a distinctive ring for fax auto–answer.
If neither of these configurations is available to you, you cannot accept faxes on your printer in the Fax Auto–Answer mode. You can accept them manually, though. See Manually receiving fax.
Using an answering machine with the ESP 9 All–in–One fax
If you use an answering machine to retrieve and record messages from telephone callers when you are not available to pick up the handset, you can set up your telephone to work with both the answering machine and the printer.
However, because answering machines cannot recognize fax calls or record fax signals for conversion later to a fax printout, care must be taken if you plan to accept fax calls automatically.
Before using your printer to accept faxes automatically when you are also using an answering machine, make sure the answering machine is connected correctly to the printer (see the illustrations that follow). Make sure the answering machine is set to answer calls before the printer. See Specifying rings to answer.
Connecting the phone and fax
Identify the type of fax connection appropriate for you from the information below, and follow the instructions to configure your printer for sending and receiving faxes.
| Type of Fax Connections | Fax Setup Procedure |
|---|---|
|
Multipurpose (broadband) digital telephone systems |
|
|
Standard telephone systems |
|
|
Digital subscriber line (DSL) systems |
Connecting the printer to a digital telephone service line
If the telephone line you intend to use for faxing through the All-in-One printer is configured to either an Internet phone service or to a cable phone service, connect your printer to the phone as described below:
-
Disconnect the phone cord from the wall jack that connects your modem to the telephone wall jack and plug it into the port labeled LINE-In on your printer.
-
If you use an answering machine:
-
Connect your answering machine to the EXT-Out port on the back of your All-in-One printer.
CAUTION:
The answering machine should be set to a fewer number of rings than the Rings to Answer setting. This will ensure that the answering machine picks up first.
See Specifying rings to answer.
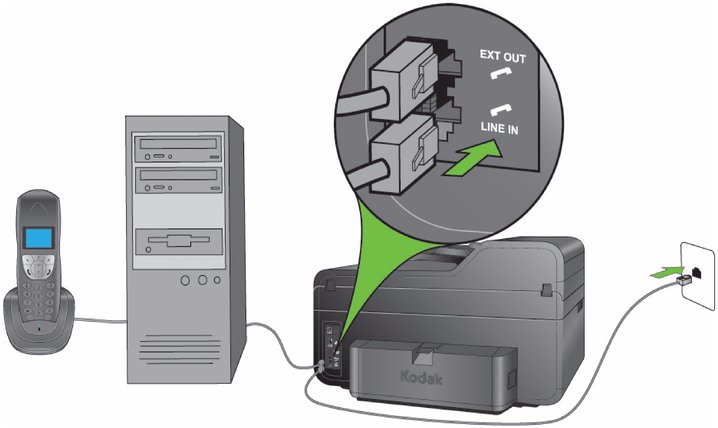
NOTE: Check with your cable television provider to make sure you can send and receive faxes over your digital telephone service.
-
Connecting the printer to a standard telephone line
If you have a dedicated phone line that does not receive any voice calls, connect your printer to the Line-In on the printer as described below.
-
Connect one end of the phone cord supplied with your printer to your telephone wall jack and the other end to the port labeled Line-In.
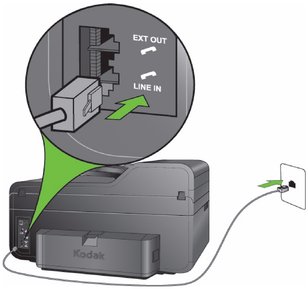
-
When the phone rings your printer is set to answer automatically after the number of rings set in the Rings to Answer setting. See Specifying rings to answer.
-
If you use an answering machine, connect your answering machine plug into the port labeled EXT-Out on your printer. Set the number the of rings on your answering machine to a lower number of rings than the Rings to Answer settings on your All-in-One printer. If you are using a dedicated telephone line to send or receive faxes, use the LINE-In port on your printer. Do not connect the answering machine to the EXT-Out port on your printer.
If you have a separate fax line on that does not receive any voice calls, connect your printer to the phone line as described in Connecting the printer to a digital subscriber (DSL) telephone line below.
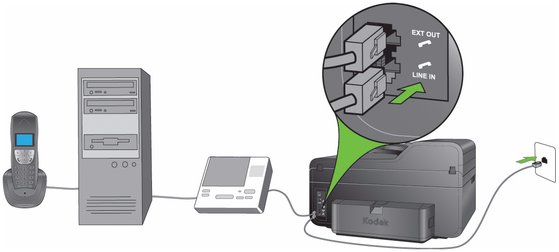
Connecting the printer to a digital subscriber (DSL) telephone line
If you use a digital subscriber line (DSL), you must connect a DSL filter between the telephone wall jack and your Kodak All–in–One printer. Without the DSL filter for your digital subscriber line, you not be able to send and receive faxes.
-
Obtain a DSL filter from your DSL provider.
-
Connect the one end of the phone cord supplied with your Kodak ESP 9 All–in–One printer to the open port on the DSL filter, and the other to the printer port labeled Line-In.When the phone rings your printer is set to answer automatically after the number of rings set in the Rings to Answer setting. See Specifying rings to answer.
-
If you use an answering machine, connect your answering machine to the port labeled EXT-Out on your printer. This provides a direct connection between the printer and your answering machine.
CAUTION:
When the phone rings, your printer will answer after the number of rings set in the Rings to Answer setting. The incoming fax will be received when the printer detects there is an incoming fax. -
Connect the DSL filter cord to the telephone wall jack.
Specifying rings to answer
You can specify how many rings should occur before the All–in–One printer automatically answers an incoming call. This setting applies only if the fax auto–answer feature is set to On.
The rings–to–answer setting is critically important for you if an answering machine shares the same phone line as your All-in-One printer, because the answering machine must answer the phone first. If this parameter is not set correctly, the answering machine cannot record any incoming calls.
| NOTE: | If you use a voice messaging service instead of an answering machine, this option is not effective. See Setting fax auto–answer below and Specifying a distinctive ring for fax auto–answer. |
The All–in–One printer monitors every call into the phone line, including calls picked up by the answering machine. If it detects incoming fax tones, it will receive the fax. It ignores any call that does not transmit the fax tones and allows the answering machine to record it.
Set the number of rings-to-answer for the printer to exceed the number rings set for the answering machine .
| NOTE: | This ESP 9 All–in–One printer allows you to specify the rings–to–answer from 1–6 rings. Make sure your answering machine is set to answer calls in fewer rings than your choice for rings–to–answer for your printer. For more information, see Fax Settings options. |
Setting fax auto–answer
When set to On, the All–in–One printer accepts incoming fax transmissions automatically, based on the number set in rings–to–answer (see Specifying rings to answer above).
If your fax phone line is configured to work through a computer modem, disable fax auto-answer.
| NOTE: | Some phone system features may not be available with pulse dialing, which is slower than tone dialing. Contact your telephone company if you are unsure as to which setting to use. |
Manually receiving fax
If fax auto–answer is set to Off, there are two ways to accept an incoming fax and print it with the All–in–Oneprinter. You can:
-
Press the Start button on the All–in–One printer control panel when you pick up the telephone handset and hear fax tones.
-
Using any phone that uses the same telephone line used by the All–in–One printer for fax, dial the Remote Access Code 234.

Tip: Is your All–in–One printer located in a separate room from a telephone with the same number used by the ESP 9 All-in-One printer? If so, remember to dial 234 when you pick up the phone and hear incoming fax tones.
Specifying a distinctive ring for fax auto–answer
If you have one phone line shared by two or more phone numbers, your telephone service provider may be able to provide distinctive ring patterns for each phone number. For example, if you have designated one number as the number for receiving and sending faxes, you may have a ring pattern different than the pattern used for the phone number used for your personal voice calls or your business voice calls.If you have voice mail on your shared phone line that you use for sending or receiving faxes and do not have access to distinctive ring through your telephone service, you should disable fax auto-answer.
By using the distinctive ring feature on the ESP 9 All-in-One printer, when the printer detects the ring pattern specified for incoming faxes, it will automatically answer the call and receive the fax.
| NOTE: | If you use one phone number and one phone line exclusively for faxes, set distinctive ring to Any. For more information about the Fax Settings menu, see Fax Settings options. |
If two or more phone numbers are shared, set the distinctive ring feature to answer one of the lines and set fax auto–answer to On. See Specifying rings to answer to review how to use fax auto–answer with an answering machine.
Also see the note discussing voice messaging services on Specifying a distinctive ring for fax auto–answer if you have this type of fax setup and subscribe to voice messaging through your telephone company.
Configuring fax settings
You can adjust fax settings on the control panel. Windows users can also create a list of frequently used Fax telephone numbers using Home Center software (for more details, see Home Center Help, discussed on All-in-One printer Home Center software ).
Both Windows and Macintosh users can set up a list of fax telephone numbers on the control panel by selecting Send a Fax from the Main menu. Windows users can also set up and maintain their Fax Phonebooks using Home Center software. For information on setting up and maintaining the Fax Phonebook, see Fax Phonebook entries.
Fax Settings options
| Menu Options | Settings / Actions |
|---|---|
|
Edit Phonebook |
Press OK to view Fax Phonebook options |
|
Fax Sender Information |
Press OK to view on-screen keyboard and enter information |
|
Fax Auto–Answer |
Press |
|
Press |
|
|
Press |
|
|
Press |
|
|
Press |
|
|
Call-Waiting Disable Code |
*70 is default |
|
Press |
Any |
|
Single Ring |
|
|
Double Ring |
|
|
Triple Ring |
|
|
Press |
|
|
Press |
Never |
|
Always |
|
|
After Failure Only |
|
|
Print Fax Settings |
Press OK, then press Start |
|
Press OK, then press Start |
|
|
Press OK, then press Start |
|
|
Press |
|
|
Press |
 or
or  to switch setting between On/Off
  or
or  to change setting from 1–6 rings
  or
or  to switch setting between Yes/No
  or
or  to switch setting from 0-12
  or
or  to switch setting between Yes/No
  or
or  to change setting
  or
or  to switch setting between On/Off
  or
or  to change setting
  or
or  to switch setting between Tone/Pulse
  or
or  to switch setting On/Off
 a Some phone system features may not be available with pulse dialing, which is slower than tone dialing. Contact your telephone company if you are unsure about which setting to use.
b When the Error Correction mode is enabled, the printer detects errors during transmission. Using this feature, the All-in-One printer will automatically re-transmit the fax. Although the Error Correction mode increases send time on poor phone lines, the fax is transmitted much more reliably.
| NOTE: | Error Correction is only applied to black-and-white faxes sent from the All-in-One printer. This feature does not affect the reliable transmission of faxes being received. |
-
From the control panel, press Menu.
-
Press
 until Fax Settings is selected, and then press OK.
 -
Press
 until the option you want to configure is selected, and then press OK.
 -
As needed, press
 or
or  to set the desired sub-setting, as in configuring your sender name and telephone numbers.
 -
As needed, press
 or
or  to change the setting.
 -
Press OK to save the setting(s).
Previous Next