KODAK EASYSHARE W820/W1020 Wireless Digital Frames — Extended user guide
Table of Contents > Setting up for wireless operation > Connecting to your wireless network
2 Setting up for wireless operation
Connecting to your wireless network
To allow your frame to access the contents of your computer wirelessly, connect your frame to your wireless home network.
| NOTE: | If you are not sure you have a wireless network, ask the person who set up your computer. |
-
First time—If this is the first time you turned on your frame, tap the light next to Save after you set your language (see Setting your language).
The Scanning for available wireless networks screen appears.

Available wireless networks are listed.
You can slide to highlight Exit without connecting, then tap OK (or tap Back) to dismiss the screen and go to the Home screen (see Viewing the Home screen).
If you want to connect to your wireless home network later and start enjoying your pictures now, insert a memory card. Or, connect a camera or other USB device with pictures (see Connecting a digital camera or other USB device).
Later—To connect to your wireless home network later:
-
a. Tap Home
 ® Settings
  .
. -
b. Slide to highlight Network, then tap Select.
-
c. Highlight Scan for wireless networks, then tap OK.
-
d. Follow the screen prompts and continue with step 2 below.
If your wireless network is not found:
-
a. Slide to highlight My network not shown, then select OK.
-
b. Check that your router is on and your frame is close to the router, then select Scan again.
If your wireless network is still not found, your network does not broadcast SSIDs. You then need to enter your network SSID (sometimes called the network name) manually:
-
a. Select Enter SSID, then tap OK.
The on-screen keyboard appears.
-
b. Using the on-screen keyboard, enter the SSID in the text box, (
 ). Tap Done when finished.
The person who set up your network can help you with this information. Or, tap Back then tap Help me connect for more information.
-
-
With your home network highlighted, tap OK to connect to your home network.
The Connecting (or the wireless network security screen, if enabled) appears.
Or, tap Exit to go to the Home screen without connecting. (See Viewing the Home screen.)
Enter security key (if you have wireless network security enabled)
You are prompted to enter your security key (WEP or WPA) using the on-screen keyboard. Slide along the bottom of the touch border (or tap below the slider arrows) to highlight a character, then tap
 (Select) to enter it in the text box. Tap Done when you are finished entering all the characters.
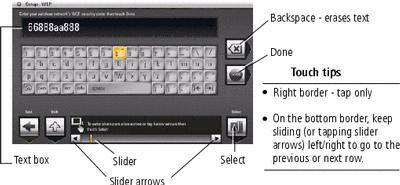
If you do not have security enabled, go to step 3. (We recommend that you enable your network security to prevent others from accessing your wireless home network.)
NOTE: The screen identifies your security as either WEP or WPA.A WEP security key can be either: 5 or 13 characters (0-9, A-Z, some special characters, case sensitive)
10 or 26 characters (0-9, A-F, not case sensitive).
A WPA key is 8-63 characters, case sensitive.
The person who set up your network can provide you with this information.
Congratulations! You have successfully connected your frame to your wireless network!
-
If you haven't done so already, install the KODAK EASYSHARE Digital Display Software on your WINDOWS OS computer (see Installing the software: WINDOWS OS only) so you can set up and customize your frame right from your computer wirelessly. For MAC OS users, see MAC OS users.
-
Tap OK when you are done installing the software.
Previous Next