Kodak ESP 9 All-in-One Printer — User Guide
Table of Contents > Printer Overview > Using the All-in-One printer menus
2 Printer Overview
Using the All-in-One printer menus
Use the menus on the LCD screen to select stand-alone tasks (that is, tasks that can be performed without your computer), such as copying documents or photos; printing photos stored on memory cards, USB drives, Kodak Bluetooth adapter ("dongle"), or digital cameras plugged into the printer; or sending a fax.
Using the appropriate menu, you can also initiate tasks that will be completed on a computer connected to the printer, such as transferring photos from a compatible device connected to the printer (such as a memory card, digital camera, or USB drive) to the computer.
Your printer updates the content of the menu dynamically, according to the tasks you perform.
Menu layout
A description of how the menus are displayed in the printer control panel is shown in the illustration and the legend below.
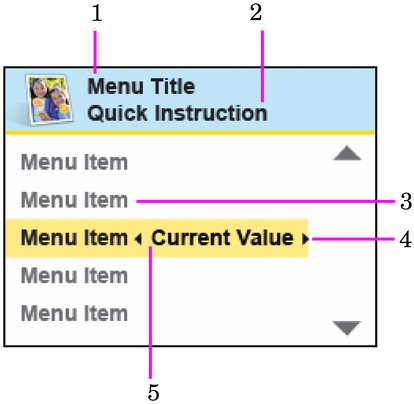
| Number | Description |
|
1 |
The Menu Title displays at the top of the menu. It names the category of available options. For example: Copy Document Options, Print Photo Options, etc. |
|
2 |
The text displayed in the Quick instruction section, when displayed below the Menu Title, describes how to activate the selected menu option. For example: Press OK to continue, etc. |
|
3 |
Any option in a row with a white background has not been selected. To use the option in a white row, you must navigate to it by pressing either the |
|
4 |
The
Current Value
content displayed between |
|
5 |
The option in the row with the golden background is the selected option. Its functionality is enabled when you press the appropriate control panel button. When |
 or the
  button on the control panel. See
  and
and  symbols indicates the active setting only when you have more than one setting available. For example: On/Off, Yes/No, a number representing a quantity, etc.
  or
or  are pressed, the selected menu option changes according to the direction used. See
 Menu structure
The top-level menu on your All-in-One printer is called the Main menu. When you press OK on most Main menu items, another menu displays. You can press Start as specified in the Quick instruction section beneath the menu title (see item 2 in the "Menu layout" illustration and accompanying table, above) to initiate a task.
You can review details about each menu available in your All-in-One printer using the information below:
| Main menu option | When you press OK: | To review details about the option: |
|---|---|---|
|
Copy Document |
Displays Copy Document Options menu |
|
|
Copy Photo |
Displays Copy Photo Options menu |
|
|
View and Print Photos |
Displays Print Photos Options menu |
|
|
Scan |
Displays Scan Options menu |
See Scan options |
|
Send Fax |
Displays Fax Options menu |
|
|
Fax Auto-Answer |
Sets Fax Auto-Answer On or Off |
|
|
Fax Settings |
Displays Fax Settings menu |
|
|
Network Settings |
Displays Network Settings menu |
|
|
Printer Settings |
Displays Printer Settings menu |
|
|
Maintenance |
Displays Maintenance menu |
|
|
Help |
Displays Help menu |
See Help menu |
Status lights
The tables below describe the meaning of each light and condition, and offer tips on what action to take.
| On/Off Lights | ||
|---|---|---|
| Light Status | Cause | Action / Solution |
|
Off |
The printer is turned off. |
Press On/Off to turn the printer on. |
|
The printer does not have power applied. |
Ensure that the printer power cord is properly plugged into the back of the printer. Verify that the power supply and or power cord LED is lit. Check that the power supply is connected to the power cord, and that it is properly connected to the electrical outlet.a |
|
|
Blinks |
The printer is initializing or busy. |
None. Allow the printer to finish the initialization process. |
|
On |
The printer is ready. |
None. |
a Most power supplies used with this ESP All-in-One printer are equipped with a status light which illuminates when electricity is applied. If you cannot determine if the power supply is working properly, contact Kodak Service & Support for assistance.
| Printer Power Cord Light | ||
|---|---|---|
| Light Status | Cause | Action / Solution |
|
Off |
The printer power cord is not properly connected to the printer. |
Reconnect the printer power cord plug to the printer. |
|
The electrical power cord is not properly connected to your electrical outlet. |
Reconnect the cord to the electrical outlet. Ensure that the electrical power cord is fully connected to the alternating current (AC) adapter at the end of the printer power cord. |
|
|
The electrical outlet has no power. |
Plug a working device into the wall outlet to test it, or have it checked by an electrician. |
|
|
The problem may lie with the power supply. |
Check the power supply status light, if available. As needed, visit Kodak.com for additional troubleshooting steps, or contact Kodak Service & Support. |
|
|
On |
The power supply is supplying power to the printer. |
None. |
| Memory Card Slot Light | ||
|---|---|---|
| Light Status | Cause | Action / Solution |
|
Off |
Either the memory card is not inserted or is improperly inserted in the card slot. |
Remove and reinsert the memory card. |
|
Blinks |
The internal card reader is initializing or communicating with a memory card. |
None. |
|
On |
A memory card is properly inserted in the card slot. |
None. |
| Attention Light | |
|---|---|
| Light Status | Error |
|
Off |
None. |
|
Blinks (slow) The LCD screen describes the error. |
Paper jam. Paper tray empty. Paper carriage stall. Paper size or type mismatch. Change ink cartridge. Ink cartridge not readable. Printhead not calibrated. Unit open, scanner lid open, rear access door open. Too many image sources. Printhead not installed. Unable to read memory card or USB host device. |
|
Blinks (slow) |
Ink cartridge(s) inserted incorrectly. Ink cartridge(s) not installed. |
|
On |
Media sensor failure. Printhead failure. Scanner failure. |
| Wi-Fi Light | ||
|---|---|---|
| Light Status | Cause | Action / Solution |
|
Off |
This indicates that the Wi-Fi radio is turned off and the printer is not connected to a wireless network. |
None. |
|
Blinks continuously |
The Wi-Fi radio is turned on and the printer is searching for available wireless networks within range. |
None, unless you want to stop the connection process. If so, turn the Wi-Fi radio off. |
|
Blinks intermittently The LCD screen displays an error message |
The Wi-Fi radio is turned on and:
|
Press OK to turn off the error message on the LCD screen and then turn the Wi-Fi radio off. Run the Wi-Fi Setup Wizard to find and connect to an available wireless network within range.a |
|
On |
The Wi-Fi radio is turned on and there is a working connection between the printer and a wireless network. |
None. |
a If you acknowledge the error message by pressing OK, the light will go off. However, if the Wi-Fi radio is not turned off and the printer cannot establish a connection to an existing Wi-Fi network, the light will resume blinking, and the error message will display again.
Previous Next